Friday, 27 February 2009

My 14th Award

I received this award from Lisa @ Lisa's Creative Clutter Too... here
Please drop by and visit this awesome site.
She has tuts and wordart and omg does this site rock,
please call by and leave some love.
I need to pass this on to 5 awesome blogs.
well most have already received this award,
so I will name my top 5.
  1. Scraps Dimensions here
  2. Bea Creations here
  3. Blissfully Beth here
  4. Kittz Kreations here
  5. Cinnamon Scraps here

Congratulations Ladies you have awesome sites and I love them all.

Luv Jo.xx.
Thursday, 26 February 2009

Kiss Me I'm Irish

Supplies Needed:
image of choice, Im using the fabulous artwork of Keith Garvey, you can purchase here
Scrapkit - FTU - Irish Charm By Bluedream Designs here
Mask #1 By Devine Dzines here

Plugins:
VM Extravaganza - Transmission

OK Lets Go.

Open a new image 600x600 pixels white, Open frame 4 from the kit, edit-copy, paste as a new layer, Image-Resize by 80%, using your magic wand, select inside the frame, Selections-Modify-Expand by 3, Open paper of choice, I used paper 7, edit-copy, paste as a new layer, Selections-Invert, hit delete, Selections-Select None. Move this layer down in the layer palette, below your frame layer.
Open image of choice, edit-copy, paste as a new layer, I also resized mine by 90%, position, Layers-Duplicate, move original layer below your frame layer. Select your frame, Selections-Select All, Selections-Float, Selections-Defloat, Select your bottom image layer, and delete any parts overhanging your frame, Select your top image layer and again delete any overhang.

On your image layer, add a dropshadow of choice, I used 5-5-50-9.90 Black.

Select your frame layer add a dropshadow of choice, I used 4-4-35-7.92 Black.

Select your white background layer, Open paper of choice, I used paper1, edit-copy, paste as a new layer, Open your mask#1 by Devine Dzines and minimise, Layers- New Mask Layer-From Image, In the drop down box, select 1.jpg, Layers-Merge,Merge-Group. Image-Resize 140%, All layers not ticked, and position, add a dropshadow of choice, I used 3-3-34-3 Black.

Select Raster 2 layer, Layers-Duplicate, on your bottom raster 2 layer, Layers-Arrange-Send to bottom, move below your mask layer, Adjust -Blur-Gaussian Blur-50, Layers-Duplicate, Layers-Merge-Merge Down, Effects-Plugins-VM Extravaganza-Transmission @ Default Setting.

Add any elements of choice from the kit.

Add your name and copyright.

I hope you found this tut easy to follow.
I would love to see your results.
Luv Jo.xx.

St Patricks Day

Supplies Needed:
Image of choice, Im using the awesome artwork of Pinup Toons which you can purchase here
Template-Pack of 4 Templates No.4 By Dezigns By Ali here
Leprechaun and Pot of gold courtesy of Rainbow Coffi here
Scrapkit -PTU- Bit O'Green By Jill @ Created By Jill here
Kit can be purchased here
Mask#27 By Itazura here

Ok Lets Go.

Open your Template no.4, "Shift D" to duplicate, close original template layer. Image-Resize 600 pixels width, make sure Lock Aspect Ratio and Resize All Layers is ticked.

Image-Canvas Size 600x600 pixels, placement middle-centre. Delete the both raster 7 layers and the Raster 6 layer. Layers-New Raster Layer, Floodfill white. Layers-Arrange-Send To Bottom.

Select Raster 1 layer, using your magic wand, select inside the shape, Open paper 4, Image-Resize 600x600 pixels, edit-copy, paste as a new layer onto your template tag, Selections-Invert, hit delete, Selections-Select None, Delete the original Raster 1 layer.

Select copy of raster 1 layer, Repeat the above process using paper8, and delete the original copy of raster 1 layer.

Repeat this process with raster 3,4 and copy of raster 4 using papers of choice.

With the raster 3 layer I also applied a dropshadow of 3-3-34-3 Black, and repeated again using -3 for both horizontal and vertical.

With both Raster 5 layers and raster 2 layer. Selections-Select All, Selections-Float, Selections-Defloat, Open paper of choice, I used paper 5, Image-Resize 600x600 pixels, edit-copy, paste as a new layer onto tag template, Selections-Invert, hit delete, Selections-Select None.

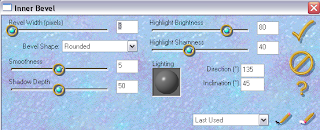
I also applied Effects-3D Effects-Inner Bevel-with these settings:- ( also applied a dropshadow of 3-3-34-3 Black.
Open Image of choice, edit-copy, paste as a new layer, and position. I also applied a dropshadow of 5-5-59-8.91 Black.

Add any other elements of choice from the kit.

Select your white background layer, Open paper 8, Image-Resize 600x600 pixels, edit-copy, paste as a new layer, Layers-Load/Save Mask-Load Mask From Disk-Itamasque027, Layers-Merge Merge Group.

Add your name and copyright.

Save as .png or .jpg however you prefer.

I hope you found this tut easy to follow.
I would love to see your results.
Luv Jo.xx.

Wednesday, 25 February 2009

Tis A Great Day

Supplies Needed:
Image of choice, Im using the fabulous artwork of Pinup Toons, you can purchase here
Scrapkit PTU - Bit O Green By Jill @ Created By Jill here
Kit can be purchased here
Scenic image of choice, image used is by Winterdove courtesy of stock.xchng here
Mask#55 By Rachel @ Enchanted By Darkness here

OK Lets Go.

Open a new white image 600x600 pixels, Open frame1 from the kit, edit-copy, paste as a new layer, using your magic wand, select inside the frame, Selections-Modify-Expand by 4, Open paper of choice, I used paper 7, Image-Resize 600x600 pixels, edit-copy, paste as a new layer, onto your tag, Selections-Invert, hit delete, Selections-Select None. In your layer palette move this layer below your frame layer.

Open your beadedshamrock, edit-copy, paste as a new layer above your frame, and position inside the frame, using your magic wand select inside the beaded shamrock, be sure to select the bits between bow and beaded frame, Selections-Modify-Expand by 2, Open your scenic image of choice, I resized mine by 50%, edit-copy, paste as a new layer, Selections-Invert, hit delete, Selections-Select None. Move this layer below the beaded shamrock layer.

Add a dropshadow of choice to both frame layers, I used 3-3-32-3 Black.

Open image of choice, edit-copy, paste as a new layer, position how you prefer. I resized mine by 85%, add a dropshadow of choice, I used 5-5-48-8.91 Black.

Add any other elements of choice from the kit.

Select your white background layer, Open paper of choice, I used paper 8, Image-Resize 600x600 pixels, edit-copy, paste as a new layer, Layers Load/Save Mask - Load Mask From Disk-EBDMask55. Layers - Merge - Merge Group.

Add your name and copyright.

Save as .png or .jpg however you prefer.

I hope you found this tut easy to follow.
I would love to see your results.
Luv Jo.xx.

Tuesday, 24 February 2009

Tags Made Using My Tuts


These awesome tags were made by some fabulous members of PSP Obsessions here
using my tuts, which I also post there.
Thank you so very much Pam, MagnettaRose, DarkAngelRose and Bobbisox for showing me your results.
Pam didnt have the PTU Kit I used so she used another kit, and learnt how to add steam.
Well I think it looks amazing hunni, thank you for showing me, and I am glad the tut helped.
Luv Jo.xx.

Tag Using My Cutie Pie Tut

This beautiful tag was made by Ladjaa using my Cutie Pie Tutorial.
It looks awesome and the Hitana image looks amazing.
Thank you for showing me your results.
Luv Jo.xx.

Strawberry Delight

Supplies Needed:
Image of choice, I'm using the lovable artwork of Erica Reis, which you can purchase here
Scrapkit PTU- Strawberry Kisses By Lynn @ Poundstore Scraps here
Template#25 By Designs By Ali here
Mask#22 By Becky Available here

Ok Lets Go.

Open your template, "Shift D" to duplicate, delete the original template. Image-Resize 600 pixels width, Lock Aspect Ratio ticked and Resize All Layers ticked.
Delete the DBA © layer, Layers-New Raster Layer, Selections-Select All, Floodfill white, Layers-Arrange-Send To Bottom, Selections-Select None.

Select the backlayer, Selections-Select All, Selections-Float, Selections-Defloat, Open paper of choice, I used paper6, edit-copy, paste as a new layer onto your tag, Selections-Invert, hit delete, Selections-Select None. Delete the original backlayer.

Select Circle1 layer, using your magic wand select inside the circle, open paper of choice, I used paper2, Image-Resize 400x400 pixels, edit-copy, paste as a new layer, position over the selection, Selections-Invert, hit delete, Selections-Select None. Delete the original circle1 layer.

Select 3 circles layer, Using your magic wand, select inside each circle, you may need to hold down the "Shift" key to select all 3, Open paper of choice, I used paper1, edit-copy, paste as a new layer, Selections-Invert, hit delete, Selections-Select None. Delete the original 3 circles layer.

Select 3 circle frames layer, Selections-Select All, Selections-Float, Selections-Defloat, Layers-New Raster Layer, using a light contrasting colour from your image of choice, I used #CBE9A5 floodfill the selection. Selections-Select None. Effects-3D Effects-Inner Bevel, using these settings:-
Open your image of choice, edit-copy, paste as a new layer, I resized mine by 85%, position and delete any parts that are overhanging the bottom of the circle1 frame, add a dropshadow of choice.

I also added the same Inner Bevel setting to the main scalloped shape.

Add any other elements of choice from the kit.

Dropshadow all frame layers, I used 3-3-34-3 Black.

Select your white background layer, Layers New Raster Layer, Floodfill with a complimenting colour of choice from the Image, I used #A5DD5F, Layers - Load/Save Mask - Load Mask From Disk-BeckyMask022, Layers-Merge-Merge Group. Layers-Duplicate, Layers-Merge-Merge Down.

Add your name and copyright.

Save as .png or .jpg however you prefer.

I hope you found this tut easy to follow.
I would love to see your results.
Luv Jo.xx.

My 12th & 13th Awards


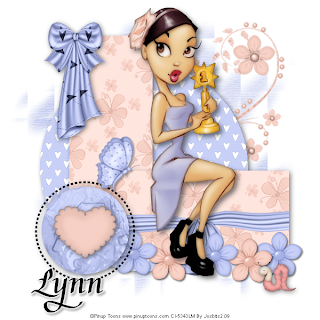
These 2 new awards were given to me by Pearl & Lill @ Devine Dzines here,
Thank you ladies, I am very proud to receive both of these.

I would like to pass these awards on to a few fabulous sites:-

Tracey @ Tigerlilly Digital Scrapbooks here
Lisa @ Frosted Illusions here
Lynn @ Poundstore Scraps here

Congratulations ladies you all deserve these awards.
Luv Jo.xx.

My 10th & 11th Award

I have received this award from Tracey @ Tigerlilly Digital Scrapbooks here
and Pearl and Lill @ Devine Dzines here
Please drop by and visit these awesome blogs.

The Premio Dardos award acknowledges the values that every blogger shows in their effort to transmit cultural, ethical, literary, and personal values every day.

The rules are:

1) Accept the award, post it on your blog together with the name of the person that has granted the award and his or her blog link.

2) Pass the award to other 15 blogs that are worthy of this acknowledgment. Remember to contact each of them to let them know they have been chosen for this award.

I would like to pass this award to:-

Bluebird @ Bluebirds Blog Here
Diane @ Candy's treats Here
Lisa @ Lisa's Creative Clutter Too... Here
Lynn @ Poundstore Scraps Here
Jaye @ Sparkling Special Designs Here
Nicole @ Jbs2designs Here
Beth @ Blissfully Beth Here
Lacarolita @ Lacarolita's Designz Here
Doris @ Scraps Dimension Here
Rachel @ Scraps Of Enchantment Here
Jan @ Witches Cauldron Designs Here
Dee @ Little Mama Dee's PSP Tuts Here

I have only passed this on to 12 blogs, but they are truly awesome, please drop by and say hi.
Luv Jo.xx.

Spring Is In The Air

Supplies Needed:
Image of choice, im using the beautiful artwork of Caron Vinson, which you can purchase here
Scrapkit is PTU- Girls World By Lynn @ Poundstore Scraps here
Template#7 By Rachel of Scraps of Enchantment here
Mask used is ra-mask05 which I received through a group, if this is yours please let me know so I can credit you or remove, available here
Scenery image of choice, or the one i used here

Plugins Used:
VM Extravaganza - Transmission here
Xero - Porcelain here

Ok Lets Go.

Open a new image 600x600 pixels white, Open your template, select frame 1 layer, edit-copy, paste onto your white image as a new layer, using your magic wand select inside the shape, Open paper of choice, I used paper5, Image-Resize 600x600 pixels, edit-copy, paste as a new layer onto your tag, Selections-Invert, hit delete, Selections-Select None. Delete the original frame 1 layer from your tag.

Back to template, select frame 2 layer, edit-copy, paste as a new layer onto your tag, using your magic wand, select inside the frame2 shape, Open paper of choice, I used paper1, Image-Resize 600x600 pixels, edit-copy, paste as a new layer onto your tag, Selections-Invert, hit delete, Selections-Select None. Delete the original frame 2 layer from your tag.

Back to the template, select photoframe layer, edit-copy, paste as a new layer onto your tag, using your magic wand select inside the black photoframe background, Selections-Modify-Expand by 1, hit delete, Open paper of choice, I used paper2, edit-copy, paste as a new layer onto your tag, Selections-Invert, hit delete, Selections-Select None. Move this layer below your white photoframe layer, Add a dropshadow of choice to the white photo layer, i used 3-3-34-3 Black.

Select your photo frame background layer, Open your scenery image of choice, edit-copy, paste as a new layer, I also resized mine by 120%, Select frame background layer again, Selections-Select All, Selections-Float, Selections-Defloat, Selections-Invert, select your scenery image layer, hit delete, Selections-Select None, (this will erase any parts that overlap your photoframe background.) In your layer palette reduce the opacity of this layer to 81.

On both scalloped frame layers, I also applied a gradient glow of 6 and dropshadowed 3-3-34-3 black.

Select your white photoframe layer, Open image of choice, edit-copy, paste as a new layer onto your tag, Add a dropshadow of choice, I used 4-4-51-9.90 Black, Effects-Plugins- Xero-Porcelain using the default settings.

Select your white background layer, Open paper of choice, I used paper4, Image-Resize 600x600 pixels, edit-copy, paste as a new layer onto your tag, Layers Load/Save Mask-Load Mask From Disk, Mask ra-mask05, Layers Merge-Merge Group. Image-Resize 110%, Layers Duplicate, on the bottom mask layer, Adjust-Blur-Gaussian Blur -20, Effects-Plugins-VM Extravaganza-Transmission - Default Settings.

Add any other elements of choice from the kit.

Add your name and copyright.

Save as .png or .jpg however you prefer.

I have you found this tut easy to follow.
I would love to see your results.
Luv Jo.xx.

Saturday, 21 February 2009

A Dream Is A Wish

Supplies Needed:
Image(s) of choice, Im using the fabulous artwork of Pinup Toons, which you can purchase here
Template#10 By Rachel @ Scraps Of Enchantment here
(Download links are located on the side panel.)
Scrapkit - FTU Sapphire By Lynn @ Poundstore Scraps here
Mask#88 By Itazura here

Plugins:
Eye Candy 5-Impact-Bevel (other bevel plugins could easily be used instead)

Ok Lets Go.

Open your template and "Shift D" to duplicate, close the original template, delete the © and the brush2 layers. Image-Resize 600 pixels width, lock aspect ratio-ticked, Image-Canvas Size 600x600 pixels, placement middle-centre.

Select your background layer, Selections-Select All, floodfill white, Selections-Select None.

Open paper of choice, I used paper 6, edit-copy, paste as a new layer, Layers-Load/Save Mask-Load Mask From Disk-Itamasque088. Layers-Merge-Merge Group.

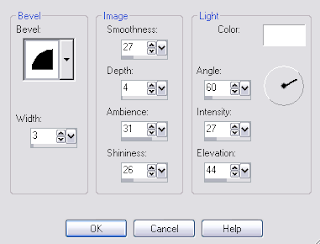
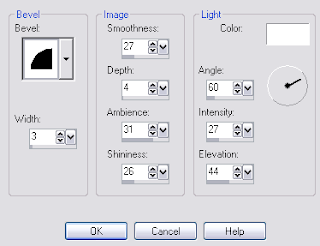
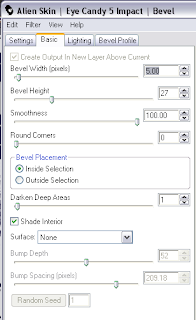
Select LrgeRectangle1 layer, using your magic wand, select inside the shape, Open paper of choice, I used paper 10, edit-copy, paste as a new layer, Selections-Invert, hit delete, Selections-Select None. Repeat this process again but with your LrgeRectangle 2 layer, On both your paper filled rectangle layers Effects-Plugins-Alien Skin -Eye Candy 5 Impact - Bevel, with the settings shown below:-
Delete both of the original LrgeRectangle Layers.

Select SmallRectangle1 layer, using your magic wand, select inside the shape, Select your Large Rectangle Layer that is below the selection, hit delete, Selections-Modify-Expand by 3, Open paper of choice, I used Paper 7, Image-Resize-500x500 pixels, edit-copy, paste as a new layer, Selections-Invert, hit delete, Selections-Select None. Move this layer down in your layer palette below your bevelled frame. repeat this process with your SmallRectangle2 layer.

Add a slight dropshadow to both bevelled outer frames, I used 3-3-34-3 Black.

Select shape1 layer, using magic wand select inside the shape, Open paper of choice, I used paper 4, edit-copy, paste as a new layer, Selections-Invert, hit delete, Selections-Select None. Delete the original shape1 layer. Repeat with shape2 layer.

Select Dot Outline 1 layer, Adjust-Sharpness-Sharpen, add a slight dropshadow I used 3-3-34-3 Black. Repeat with dot Outline 2 layer.

Select Brush 1 layer, Layers-Duplicate, Image-Flip, Image-Mirror, position both brush layers so the the ends of the brush are behind the flower layer.

I deleted both heart layers and replaced using the silk hearts from the kit, which I resized by 50% then again by 60%, make sure these layers are above the dot outline layers.

Open your main image of choice, edit-copy, paste as a new layer, position and add a dropshadow of choice, I used 5-5-55-10.89 Black.

If you wish you can add images inside the frames.

For the wordart, I used One Stroke Script LET, at size 30 pixels and changed it to 48 pixels for the letters D and h,

Add your name and copyright.

Save as .png or .jpg however you prefer.

I hope you found this tut easy to follow,
I would love to see your results.
Luv Jo.xx.

Made Using My Cutie Pie Tutorial


This tag is one of several extras made by the amazing Brandy Talbott,
using my cutie pie tutorial, I love these, and snagged all the extras she made.

Thank you Brandy, for sharing your results with me.
I love these extras, which I will be using in my psp forums and yahoo groups.
Luv Jo.xx.

Friday, 20 February 2009

Awesome Awesome Gift For Me

I received

I received this awesome tag today as a gift, from my awesome friend Pearl.

Surprise Im showing it off, cos I love it loads.

I hope you dont mind, hehehe tough if ya do lol.

You can see her awesome site here

Thanks hunni, By the way, My dad wants one saying Brian lol.

Luv Jo.xx.

Mardi Gras Awesome Gift

I have received this awesome tag as a gift, from my great friend Sherri,
she has written a tutorial for this tag and you can find it here

You will need to register, but she has loads of other great tutorials available their too.
Thank you so very much.
Luv Jo.xx.

Cutie Pie

Supplies Needed:
Image of choice, Im using the awesome artwork of Elias Chatzoudis, which you can purchase here
Template #44 By Blissfully Beth here
Scrapkit - FTU Sapphire Dreams By Simply Sensational Scraps here
Mask#27 by Itazura here

Ok Lets Go.

Open your template, "Shift D" to duplicate, Close the original template layer. on your duplicate template delete the © layers.
Select the outer circle layer, using your magic wand, select inside the darker outer circle, Selections-Modify-Smooth-Set both to 10, Open paper of choice, I used paper 16, edit-copy, paste as a new layer, Selections-Invert, hit delete, Selections-Select None. Delete the original outer circle layer.

Using your magic wand, select inside your outer circle frame, Selections-Modify-Expand by 4, Open paper of choice, I used paper 10, edit-copy, paste as a new layer, Selections-Invert, hit delete, Selections-Select None. Move this layer down in your layer palette below the outer circle frame.

Select your inner circle layer, using your magic wand, select inside the outer circle of the layer, Selections-Modify-Smooth-Both set to 10. Open paper of choice, again i used paper 16, edit-copy, paste as a new layer, Selections-Invert, hit delete, Selections-Select None. Delete the original inner circle layer.

Select your inner circle frame layer, using magic wand select inside the frame, Selections-Modify-Expand by 2, Open paper of choice, I used paper 13, edit-copy, paste as a new layer, Selections-Invert-hit delete, Selections-Select None. Move this layer down in your layer palette below your inner circle frame layer.

Open your image of choice, edit-copy, paste as a new layer, I also resized mine by 80%, position how you prefer, delete any parts you do not wish to see, I duplicated my image and moved one below the frame and one above and deleted from their. I also added a dropshadow to the bottom image layer, I used 5-5-54-7.92 Black.

On your rectangle layers, use your magic wand to select the outer frames and fill with colour or paper of choice, and the same with the inside of the frames, which I floodfilled with #5A95C4.

Add a dropshadow of choice to all outer frame layers. I used 3-3-34-3 Black.

Select the cutie pie layer, Image-Resize 110%, Selections-Select All, Selections-Float, Selections-Defloat, Open paper of choice, I used paper13, edit-copy, paste as a new layer, Selections-Invert, hit delete, Selections-Select None. I also applied a gradient glow of 3, and added a dropshadow 3-3-34-3 Black. Delete the original cutie pie layer.

Select your background layer, Open paper of choice, I used paper 13, Image-Resize 600x600 pixels, edit-copy, paste as a new layer, Layers Load/Save Mask-Load Mask From Disk-Mask-Itsmasque027. Layers-Merge-Merge Group. In your layer palette reduce the opacity of this layer to 46, of however you prefer.

Add any other elements of choice.

Save as .png or .jpg however you prefer.

I hope you found this tut easy to follow.
I would love to see your results.
Luv Jo.xx.

Oh Wow My 9th Award


I have received this award from Dee @ Little Mama Dee's PSP Tuts here
Please call by her site, she has some amazingly beautiful tuts available their.
Thank you Dee, for passing this award on to me.
I would like to pass this award on to
Jan @ Witches Cauldron Designs here
Congratulations Jan you deserve it,
please call by Jan's site and see the amazing scraps and other assorted designs available.

Thursday, 19 February 2009

My 8th Award

I would like to thank Pearl and Lill @ Devine Dzines for this award, please visit their site and see their many many items available free to download here
This seal is being given to the blogs which are very charming, these bloggers aims are to find friends not self promotion.
The hope of this award is that, even when the links are cut, even more friendships are propogated.
Give this award to eight blogs, who in turn must pass it on to eight more blogs, along with the award and the rules.
I would like to pass this award on to:-
  • Lisa @ Lisa's Creative Clutter Too... Here
  • Beth @ Blissfully Beth Here
  • Doris @ Scraps Dimensions Here
  • Carolita @ Lacarolita Disignz Here
  • Laurie @ Laurie Made Me Scraps Here
  • Nicole @ JBS2 Designs Here
  • Marie @ Flashgraphics Creations Here
  • Diane @ Candy's Treats Here

Please call by and visit these awesome blogs.

Please keep this award/friendship roll going.
Wednesday, 18 February 2009

About Girls

Supplies Needed:
Image(s) of choice, Im using the amazing artwork of Pinup Toons which you can purchase here
Mask#22 By Becky Available here
Scrapkit - FTU About Girls By Doris @ Scraps Dimensions here
Template#10 By Doris @ Scraps Dimensions here
Wordart#9 By Lisa @ Lisa's Creative Clutter Too...here
Font Used is Aspire here

Ok Lets Go.

Open template "Shift D" to duplicate, close the original template layer. delete sd template10, sd link, sd tag template and both sd happy wordart layers.

Select sd template 1 layer, using your magic wand select inside the shape, Selections-Modify-Smooth both set to 10, Open paper of choice, I used paper 3, edit-copy, paste as a new layer, Selections-Invert, hit delete, Selections-Select None. Delete the original sd template 1 layer.

Select sd rectangle 1 layer, using your magic wand select inside the shape, Open paper of choice, I used paper 5, Image-Resize 600x600 pixels, Image-Resize 50%, in your materials palette, set your foreground to pattern, and choose the paper you have just resized, Angle 0, Scale 100, Layers-New raster layer, floodfill with your foreground pattern, Selections-Select None. Delete original sd rectangle 1 layer. Repeat this process with the sd rectangle 2 layer.

Select sd scalloped circle layer, using magic wand select inside the shape, Selections-Modify-Smooth-both set to 10. Open paper of choice, i used paper 2, Image-Resize 600x600 pixels, edit-copy, paste as a new layer, Selections-Invert, hit delete, Selections-Select None. Delete the original sd scalloped circle layer.

Select the sd circle layer, Open Image of choice, edit-copy, paste as a new layer, I resized mine by 90%, and position. Select the sd circle layer again, using your magic wand select inside the circle, Selections-Modify-Expand by 3, Open paper of choice, I used paper 1, Image-Resize 400x400 pixels, edit-copy, paste as a new layer, Selections-Invert, hit delete, Selections-Select None. Move this layer in your layer palette below the sd circle layer.

Select sd square 2 layer, using your magic wand select inside the frame, Selections-Modify-Expand by 2, Open paper of choice, I used paper 3 and resized to 400x400 pixels, edit-copy, paste as a new layer, position so it fill the selection, Selections-Invert, delete, Selections-select None.Move this layer below the sd square 2 layer. Repeat this process with sd square 1 and 3 layers, but this time I used paper8.

On the three original sd square layers, Selections-Select All, Selections-Float, Selections-Defloat, Layers New Raster layer, floodfill with a colour of choice, I used black for the top and bottom squares and white for the middle one.

If you wish to add images inside the frames, select the sd sqaure layer of choice, using magic wand select inside the square, Selections-Modify-Expand by 2, Open image of choice, edit-copy, paste as a new layer, position the image inside the square, Selections-Invert, delete any excess, Selections-Select None.

Select your main image layer, Layers-Duplicate, Layers-Arrange-Send to Top, on the top image layer, using your eraser tool delete and parts of your image that over lap the side frames so it looks like some parts are behind, as well as leaving some in front. Select the bottom image layer and add a dropshadow of choice, I used 3-3-45-3 Black.

Add a dropshadow to all the layers,

Add any other elements of choice from the kit.

Add wordart of choice.

Select the white background layer, Open paper of choice, I used paper 6, edit-copy, paste as a new layer, Layers Load/Save Mask-Load Mask From Disk, BeckyMask022, Layers-Merge-Merge Group.

Add your name and copyright.

Save as .png or .jpg however you prefer.

I hope you found this tut easy to follow.
I would love to see your results.
Luv Jo.xx.

Life In Colour

Supplies Needed:
Image of choice, Im using the beautiful artwork of Anna Liwanag, which you can purchase here
Scrapkit - FTU In My Garden By Bluebird here
Mask#17 By Zuzanna here
Scenery Image of choice, or the one Im using available here
(I received this through a yahoo group, if this is yours, please let me know so I can credit accordingly or remove)
Wordart#12 By Me Available here

Plugins Used:
Eye Candy 3.1 - Inner Bevel
VM Extravaganza - Transmission here

Ok Lets Go.

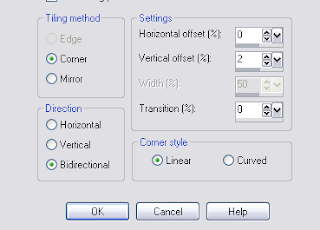
Open a new image 600x600 pixels white, Open paper of choice, I used paper7, Image-Resize 50%, Effects-Image Effects-Seamless Tiling, Settings Below:


In your materials palette, change your foreground colour to pattern, select the paper you have just made seamless from the dropdown choices, Angle 0, Scale 50. back to your white image, Layers-New raster layer, floodfill with your foreground pattern. Layers-Load/Save Mask-Load Mask From Disk, Zuzzana_mask17, Layers-Merge-Merge Group. Effects-Plugins-Eye Candy 3.1-Inner Bevel these settings. Add dropshadow of choice, I used 5-5-50-9.90 Black.


Layers-Duplicate, On the original layer, Adjust-Blur-Gaussian Blur 25, Effects-Plugins-VM Extravaganza-Transmission-default settings.
Open the frangipaniframe, edit-copy, paste as a new layer, position in the centre, using your magic wand, select inside the frame, Selections-Modify-Expand by 3, Open your scenery image, edit-copy, paste as a new layer, position so the parts you wish to see are inside the selection, Selections-Invert, hit delete, Selections-Select None. Move this layer below your frame in the layer palette.

Open image of choice, edit-copy, paste as a new layer, I resized mine by 80% twice, position how you wish, add a dropshadow of choice, I used 5-5-50-9.90 Black.

Add the same dropshadow to your frame layer.

Add any other elements of choice from the kit.

Add your wordart of choice,

Add name and copyright.

Save as .png or .jpg however you prefer.

I hope you found this tut easy to follow.
I would love to see your results.
Luv Jo.xx.

Another Fabulous Tag by Brandy

I have recently recieved this awesome tag from Brandy Talbott, showing me what she made with my Sticky Sweet Tut, I couldnt resist showing it off, isn't it great, Brandy made a few extra's in tags using this, and I snagged them all.

Thank You so very much for sharing your results with me.
Luv Jo.xx.

Tuesday, 17 February 2009

Womens Secrets

Supplies Needed:
Image(s) of choice, im using the awesome artwork, of Elias Chatzoudis, which you can purchase from here
Template#6 By Lacarolita's Designz here
Scrapkit FTU - Is this Love By Bea Creations here
Wordart#13 By Me Available here
Mask is BeckyMask042 Available here

Plugins Used:
Lokas Software Gel - Demo Available Here

Ok Lets Go.

Open your template and "Shift D" to duplicate, close the orginal template. Delete the © layer. Image-Resize 500x500 pixels-All layers ticked, select your background layer, Image-Canvas Size 600x600 pixels, placement middle-centre. Select All on the background layer and floodfill White.

Select the Raster 1 dotted frame layer, Selections-Select All, Selections-Float, selections-Defloat, Open paper of choice, I used paper 5, Image-Resize 600x600 pixels, edit-copy, paste as a new layer, Selections-Invert, hit delete, Selections-Select None. Delete the original Raster 1 dotted frame layer.

Select Raster 2 layer, using your magic wand select inside the scalloped shape, Open paper of choice I used paper10, Image-Resize 600x600 pixels, edit-copy, paste as a new layer, Selections-Invert, hit delete, Selections-Invert, Selections-Modify-Smooth 10. Selections-Invert, hit delete, Selections-Select None. Delete the original raster 2 layer.

Select the Raster 3 layer, Selections-Select All, Selections-Float, Selections-Defloat, Open paper of choice, I used paper 5, edit-copy, paste as a new layer, Selections-Invert, hit delete, Selections-Select None.

Repeat this process with the Raster 4 layer, using another paper of choice, apply Lokas Software - Gel using these settings:-

Open Image of choice, edit-copy, paste as a new layer, position how you wish and add a dropshadow of choice, I used 6-6-48-8.91 Black.

If you wish to add any images inside the frames, using your magic wand select inside one of the outer frame layers, Selections-Modify-Expand by 2, open image of choice, edit-copy, paste as a new layer, position so the parts you want showing are inside the selection. Selections-Invert, hit delete, Selections-Select None, In your layer palette move this layer down below the frame layer.

Add a slight dropshadow of choice to all layers, I used 3-3-34-3 Black.

Select your white background layer, Open paper of choice, I used paper 9, Image-Resize 600x600 pixels, edit-copy, paste as a new layer, Layers- Load/Save Mask-Load Mask From Disk-BeckyMask042, Layers-Merge-Merge Group, Layers-Duplicate, Layers-Merge-Merge Down.

Select your top layer, and add any other elements of choice from the kit.

Add any text or wordart you wish.
Add your name and copyright.

Save as .png or .jpg however you prefer.

I hope you found this tut easy to follow.
I would love to see your results.
Luv Jo.xx.

My 7th Award

I would like to send an extra special thank you to Pearl and Lill of Devine Dzines for this award.
Please drop by their site and see all the amazing creations they have available here.

I wouldn't be here at all, if it wasn't for Pearl, who has supported me and has been more like a sister than a best friend. Thank you for having faith in me, and I shall do my best not to let you down.

I would like to pass this award on to 3 more awesome sites which are:-

Bluebird @ Bluebird's Blog Here

Diane @ Candy's Treats Here

Lisa @ Lisa's Creative Clutter Too... Here

Monday, 16 February 2009

I Luv Coffee

To See Animated Version click here

Supplies Needed:
Image of choice, Im using the fabulous artwork of Pinup Toons which you can purchase here
Mask By Becky#022 you can download here
Template003 By Lollipops Candyland here
Scrapkit PTU - Peppermint Chocolate By Lynn Poundstore Scraps here

Plugins Used:
Eye Candy 3.1 - Inner Bevel
Alien Skin Xenofex2 - Constellation (If Animating)
Alien Skin Eye Candy 5 Nature - Smoke (If Animating)

Ok Lets Go.

Open Template and "Shift D" to duplicate, close original template layer. Image-Resize 600x600 pixels, delete the © layer, Layers-New Raster Layer-Floodfill white, Layers-Arrange Send to bottom.

Select the circle background layer, using your magic wand select inside the circle, Open paper of choice, I used paper 6, Image-Resize 500x500 pixels, edit-copy, paste as a new layer, Selections-Invert, hit delete, Selections-Select None. Delete the original circle frame layer.

Repeat this process with the circle frame layer, this time I used Paper 4. Once you have filled this layer and deleted original, make this layer active, Layers-Duplicate, on the original layer (not the duplicate) Adjust-Blur-Gaussian Blur-15. on the duplicated layer , using your magic wand select inside the frame, Selections-Modify-Expand by 3, Open paper of choice, I used paper 8, Image-Resize 500x500 pixels, edit-copy, paste as a new layer, Selections-Invert, hit delete, Selections-Select None. Move this layer below your frame in the layer palette.

Select your Bottom Right Frame Back Layer, Open paper of choice, I used paper 7, edit-copy, with magic wand select inside the background shape, paste as a new layer, Selections-Invert, Delete, Selections-Select None, Repeat this for the remaining Frame Back Layers.

Select one of the Outer Frame layers, Effects-Plugins-Eye Candy 3.1 - Inner Bevel with these settings.

Open Image of choice and paste as a new layer, I resized mine by 80% and added a dropshadow of 6-6-47-10.89 Black.

Select your white background layer, Open paper of choice, I used paper3, Image-Resize 600x600 pixels, edit-copy, paste as a new layer, Layers Load/Save Mask - Load Mask from Disk-BeckyMask022. In the layers palette, right click the black mask layer, Merge-Merge Group.

Add any other elements of choice from the kit.

Add your name and copyright.

If you do not wish to animate save as .png or .jpg howver you prefer.

To Animate:

Select Your Main Frame background, and duplicate twice for a total of 3 layers, Effects-Plugins Xenofex 2-Constellation with these settings, apply to other 2 layers but hit random for each layer.

If you wish to add the steam effect, Here's how:

With your freehand selection tool, make a selection around the top of the mug, Layers-New Raster Layer, Effects-Plugins- Alien Skin Eye Candy 5 Nature-Smoke with these settings,

Repeat this process till you have 3 smoke/steam layers, but hit random for each new layer. In your layer palette, reduce the opacity of each of these 3 layers to 48%.

Close off the bottom 2 smoke layers in your layer palette and the bottom 2 main frame backgrounds, Make another layer active, Edit-Copy Special-Copy Merged,

Paste as a new animation in Animation shop, back to PSP.

Repeat this process for the remaining two layers, pasting after current frame in Animation Shop.

In Animation Shop when all 3 layers are loaded, "Ctrl A" to Select All, Animation-Frame Properties, change to 25.

Save as .gif file your done.

I hope you found this tut easy to follow.

I would love to see your results.

Luv Jo.xx.

Challenge From Simply Sensational Scraps

I received this challenge from Monica and Lorna @ Simply Sensational Scraps,
thanks Ladies, not sure my kids are going to forgive me for this lol.
Go to your Picture folder on your computer, In the 6th folder go to the 6th picture.
Post the picture on your blog and explain it
Pass the challenge on to 6 friends.
Link to them on your blog and let them know they have been challenged.

Well this is a pic of my son Dion when he was just 20 months old, with my daughter Courtney at 4 weeks old, not exactly sure what he had said to her, but it looks like she was trying to say don't shoot lol, by the way they are almost 11yrs old and 9yrs old now.

I pass this challenge onto:-

  • Jaye @ Sparkling Special Designs Here
  • Karla @ Karla's Scraps Here
  • Laurie @ Laurie Made Me Scraps Here
  • Rockin @ Rockin's Ruckus Here
  • Sara @ Saras Scraps Here
  • Doris @ Scraps Dimensions Here

Saturday, 14 February 2009

Gift For Me

Image and video hosting by TinyPic


I received this fabulous tag as a gift from Lill and Pearl at Devine Dzines here


Thank you very much. I love this so very much.


Please drop by their site and see all the fabulous items they have available and all free to download.


Luv Jo.xx.
Friday, 13 February 2009

Love Is...

Supplies Needed:
Image of choice, Im using the awesome artwork of Elias Chatzoudis, which you can purchase here
Masks Used are Valentine3 By Gabee here and Mask022 by Becky, I no longer have a link for Becky's site, so you can download it here
(If anyone knows where Becky's site is please let me know so I can credit her accordingly)
Scrapkit PTU - Love Actually By Lynn of Poundstore Scraps here
Wordart #11 By Me you can download here

Plugins Used:
Eye Candy 4000 - Bevel Boss
Lokas Software - 3D Shadow - Optional
(Dropshadow can be used instead)
VM Extravaganza - Transmission

Ok Lets Go.

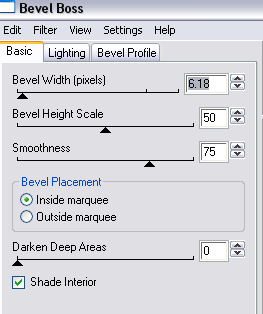
Open a new image 600x600 pixels white, Open paper of choice, I used paper 5, Image-Resize 600x600 pixels, edit-copy, paste as a new layer, Layers Load/Save Mask - Load Mask From Disk, GabeeValentineMask3, Right Click Black Mask layer in your layer palette, Merge-Merge Group. Using your selection tool, draw out a square inside the mask on the white edges, hit delete on your keyboard, Select None. Go to Effects-Plugins Eye Candy 4000 - Bevel Boss, with these settings.
Using your magic wand, Select inside the mask, Selections-Modify-Expand by 3, Open paper of choice, I used paper7, Image-Resize 500x500 pixels, edit,copy, paste as a new layer, Selections-Invert, Hit delete, Selections-Select None. In your layer palette move this layer down below your mask layer.

Open your layered heart from the kit, Image-Resize-90%, edit copy, paste as a new layer, position inside the mask frame, add dropshadow of choice, I used 3-3-33-4 Black.

Open the swag2 edit-copy, paste as a new layer, position at the top of the mask, see mine above for placement, and add the same dropshadow.

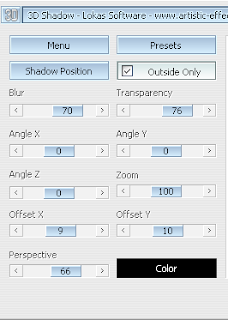
Open image of choice and paste as a new layer, and position how you prefer, add dropshadow of choice or apply Lokas 3D Shadow my settings below.

Add any other elements of choice from the kit.

Add your wordart if using any.

Select your background layer, Layers-New Raster Layer, Floodfill with a colour of choice, I used #E64E5B, Layers-Load/Save Mask-Load Mask From Disk, BeckyMask022, In your layer palette, right click black mask layer -Merge-Merge Group. Effects-Plugins-VM Extravaganza with these settings:-
Line Width 6
Offset 0
Contrast 40
Image-Free Rotate 90 degress right, all layers not ticked, then apply the VM Extravanganza -Transmission again same settings.

Add your name and copyright.

Save as .png or .jpg however you prefer.

I hope you found this tut easy to follow.
I would love to see your results.
Luv Jo.xx.

My 5th & 6th Award

I have just received my 5th & 6th award, from Tracey over at Tigerlilly Digital Scrapbooks here, and Angel of Angelflight Scraps here

Please drop by and take a look, at her awesome work. Thank you Tracey and Angel,

Here are the Rules:

• Display the image of the stamp "Look How Cool Blog" you just won!

• Post the blog link you provided.

• Indicate your choice of 10 blogs.

• Let them know.

• Post the rules.

• Check if the blogs post the prize and followed the rules..

My blog choices are:
I would like to pass this award on to the following awesome blogs:-

Lisa @ Lisa's Creative Clutter Too... Here

Jaye @ Sparkling Special Designs Here

Pearl & Lill @ Devine Dzines Here

Lynn @ Poundstore Scraps Here

Sharon @ Sharon Kay's Place Here

Bluebird @ Bluebird's Blog Here

Jael @ Jaelop Designs Here

Nicole @ jbs2designs Here

Karla @ Karla Scrapz Here

Laurie @ Laurie Made Me Scraps Here

Please take the time to drop by and visit their awesome sites.
Luv Jo.xx

Thursday, 12 February 2009

Sticky Sweet

Supplies Needed:
Image of choice Im using the amazing work of Michelle Soneja, which you can purchase here
Mask - WSL_Mask81 By Weescotslass here
Scrapkit FTU - Valentine By Bluedream Designs here
Wordart By Blissfully Beth here

Ok Lets Go.

Open a new image 600x600 white, Open frame3 from the kit, edit-copy, paste as a new layer, Image-Resize 85%, all layers NOT ticked, using your magic wand, select inside the frame, Selections-Modify-Expand by 4, Open paper of choice, I used paper8, Image-Resize 500x500 pixels, edit-copy, paste as a new layer, Selections-Invert, hit delete, Selections-Select None. Move this layer below the frame in your layer palette.

Activate your background layer, Open paper of choice, I used paper5, edit-copy, paste as a new layer, Layers-Load/Save Mask-From Disk, WSL_Mask81, In your layer palette right click the black mask layer and delete, click yes in the pop-up box, right click, Merge-Merge Group.

Select your frame layer, Open image of choice and paste as a new layer, position the tube how you prefer, add a dropshadow of choice, I used 5-5-52-9.90 Black. Make your frame layer active, Selections-Select All, Selections-Float, Selections-Defloat, select your image layer, using your magic wand, delete any parts of the tube that overlap the frame, if any bits are outside the frame, Selections-Invert and delete these bits now. Add a dropshadow of choice to your frame layer, I used 3-3-34-3 Black.

Open Wordart of choice and paste as a new layer.

Add any other elements of choice from the kit.

Add your name and copyright.

Save as .png or .jpg however you prefer.

I hope you found this tutorial easy to follow,
I would love to see your results.
Luv Jo.xx.

Wordart #13

Available for download here
Hope you like it.
Luv Jo.xx.

Wordart #12

Available for download here
Hope you like it.
Luv Jo.xx.

Wednesday, 11 February 2009

Tag Made Using My Tut.

This beautiful tag was made By Brandy Talbott, using my I Love you tut,

Thank you so very much for showing me your finished tag,
I think it looks truly amazing.
Luv Jo.xx.

No.1. Baby


Supplies Needed:
Image of choice, Im using the awesome artwork of Pinup Toons, you can purchase here
Template166 By Missy of Divine Intentionz here
Scrapkit PTU - Baby Blue by Lynn of Poundstore Scraps here
WSL_Mask5 By Weescotslass here

Plugins:
Xero - Porcelain here

Ok Lets Go.

Open template and "Shift D" to duplicate, close the original template, Select the background layer on template, Image-Canvas Size 600x600 pixels, placement - middle centre. Delete the © layer.

Activate the circle layer, using your magic wand, select inside the circle, Open paper of choice, I used paper10, Image-Resize 600x600 pixels, edit-copy, paste as a new layer, onto your tag, Selections-Invert, hit delete, Selections-Select None. Delete the original circle layer.

Activate your rectangle1 layer, using your magic wand select inside the rectangle, open paper of choice, this time I used 6, Image-Resize 500x500 pixels, edit-copy, paste as a new layer, Selections-Invert, hit delete, Selections-Select None. Delete original rectangle1 layer. Repeat this process with rectangle2 layer.

Select your small circle layer and position to where you would like it, remember to move the dotted circle too, back to small circle layer, using magic wand, select inside the circle, open paper of choice, this time I used paper 6, Image-Resize 500x500 pixels, edit-copy, paste as a new layer, Selections-Invert, hit delete, Selections-Select None. Delete original small circle layer.

Open image of choice, edit-copy, paste as a new layer, position as you wish, I then applied Xero-Porcelain with the following settings:-


Add a dropsahdow of choice, I used 5-5-50-12.87 Black.

Open paper of choice, I used paper 1, Image-Resize 600x600 pixels, edit-copy, back to tag make your white background layer active, Paste as a new layer, Layers-Load/Save Mask-From Disk- WSL_Mask5. In your layer palette, on the black mask layer, right click, Merge-Merge Group. Layers-Duplicate (twice, giving you 3 layers), Layers-Merge-Merge Down, Layers-Merge-Merge Down, so you are back to one mask layer.

Add any other elements of choice.

Add your name and copyright.

Save as .png or .jpg however you prefer.
I would love to see your results.
Luv Jo.xx.