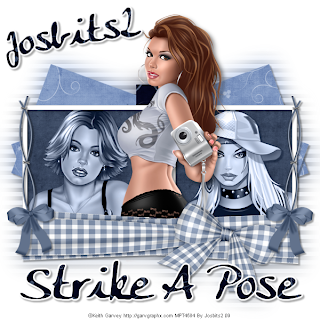
Images of choice - Im using the fabulous artwork of Keith Garvey,
which you can purchase from here
Scrapkit FTU - True Blue by Yvette of Misfits Scraps here
It is .psp format for psp8 and above. both with gradient glow and dropshadow and without.
Plugins:
VM Extravaganza - Transmission
Okay Lets Go.
Open your template,"Shift D" to duplicate, close the original template, Delete the copyright layer, Image-Resize 600 pixels width, make sure Lock aspect ratio and Resize all layers is ticked. Image-Canvas Size 600x600 pixels - placement middle-centre.
Layers-New Raster layer, Selections-Select All, Floodfill white, Selections-Select None. Layers-Arrange-Send to bottom.
Make Back Shape 4 layer active, Selections-Select All, Selections-Float, Selections-Defloat, Open paper of choice I used Yvette_TrueBlue_Paper7, Image-Resize by 60%, edit-copy, paste as a new layer, position to cover the selection, Selections-Invert, hit delete, Selections-Select None.
Delete Original Back Shape 4 layer.
Repeat this process with the remaining back shape layers.
Add a slight dropshadow to all four backshapes, I used 3-3-34-3 Black.
Make the Black Middle Box layer active, Selections-Select All, Selections-Float, Selections-Defloat, Open paper of choice I used Yvette_TrueBlue_Paper6, Image-Resize 60%, edit-copy, paste as a new layer, position so it covers the selection, Selections-Invert, hit delete, Selections-Select None. Add a dropshadow. Delete original Black Middle Box layer.
Make staples layer active, Adjust-Sharpness-Sharpen, add dropshadow.
Make Shape 2 layer active, Selections-Select All, Selections-Float, Selections-Defloat, Open paper of choice this time I used Yvette_TrueBlue_Paper14, Image-Resize 40%, edit-copy,
paste as a new layer, position over selection, Selections-Invert, hit delete, Selections-Select None. Delete original Shape 2 layer. Repeat this process for Shape 1 layer.
You can now add images to these layers if you so wish.
Frames 1 and 2 layers, Selections-Select All, Selections-Float, Selections-Defloat, floodfill with a colour of choice, I used white, add a dropshadow as before I used 3-3-34-3 Black.
Open Image of choice, edit-copy, paste as a new layer, position how you wish. Add a dropshadow of choice I used 5-5-50-11.88 Black.
Add any other elements of choice from the kit.
Add wordart of choice, or the one made by me, supplied above.
In your layer palette close off you main image layer, wordart and background layer, make another layer active, Layers-Merge-Merge Visible. Layers-Duplicate, Activate the bottom copy of the merged image, Adjust-Blur-Gaussian Blur-20.00, Effects Plugins-VM Extravaganza-Transmission with these settings:
Line Width - 6
Offset - 0
Contrast - 40.
Reopen all your layers.
Add your name and copyright.
Save as .png or .jpg however you prefer.
I hope you found this tut easy to follow.
Any problems please let me know.
I would love to see your results.
Luv Jo.xx.

No comments:
Post a Comment