Image of choice, I'm using the lovable artwork of Erica Reis, which you can purchase here
Scrapkit PTU- Strawberry Kisses By Lynn @ Poundstore Scraps here
Template#25 By Designs By Ali here
Mask#22 By Becky Available here
Ok Lets Go.
Open your template, "Shift D" to duplicate, delete the original template. Image-Resize 600 pixels width, Lock Aspect Ratio ticked and Resize All Layers ticked.
Delete the DBA © layer, Layers-New Raster Layer, Selections-Select All, Floodfill white, Layers-Arrange-Send To Bottom, Selections-Select None.
Select the backlayer, Selections-Select All, Selections-Float, Selections-Defloat, Open paper of choice, I used paper6, edit-copy, paste as a new layer onto your tag, Selections-Invert, hit delete, Selections-Select None. Delete the original backlayer.
Select Circle1 layer, using your magic wand select inside the circle, open paper of choice, I used paper2, Image-Resize 400x400 pixels, edit-copy, paste as a new layer, position over the selection, Selections-Invert, hit delete, Selections-Select None. Delete the original circle1 layer.
Select 3 circles layer, Using your magic wand, select inside each circle, you may need to hold down the "Shift" key to select all 3, Open paper of choice, I used paper1, edit-copy, paste as a new layer, Selections-Invert, hit delete, Selections-Select None. Delete the original 3 circles layer.
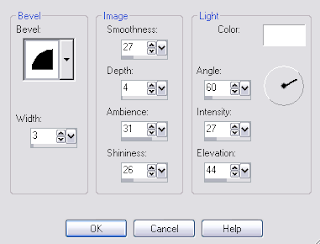
Select 3 circle frames layer, Selections-Select All, Selections-Float, Selections-Defloat, Layers-New Raster Layer, using a light contrasting colour from your image of choice, I used #CBE9A5 floodfill the selection. Selections-Select None. Effects-3D Effects-Inner Bevel, using these settings:-
 Open your image of choice, edit-copy, paste as a new layer, I resized mine by 85%, position and delete any parts that are overhanging the bottom of the circle1 frame, add a dropshadow of choice.
I also added the same Inner Bevel setting to the main scalloped shape.
Add any other elements of choice from the kit.
Dropshadow all frame layers, I used 3-3-34-3 Black.
Select your white background layer, Layers New Raster Layer, Floodfill with a complimenting colour of choice from the Image, I used #A5DD5F, Layers - Load/Save Mask - Load Mask From Disk-BeckyMask022, Layers-Merge-Merge Group. Layers-Duplicate, Layers-Merge-Merge Down.
Add your name and copyright.
Save as .png or .jpg however you prefer.
I hope you found this tut easy to follow.
I would love to see your results.
Luv Jo.xx.


No comments:
Post a Comment