Image(s) of choice, Im using the fabulous artwork of Pinup Toons, which you can purchase here
Template#10 By Rachel @ Scraps Of Enchantment here
(Download links are located on the side panel.)
Scrapkit - FTU Sapphire By Lynn @ Poundstore Scraps here
Mask#88 By Itazura here
Plugins:
Eye Candy 5-Impact-Bevel (other bevel plugins could easily be used instead)
Ok Lets Go.
Open your template and "Shift D" to duplicate, close the original template, delete the © and the brush2 layers. Image-Resize 600 pixels width, lock aspect ratio-ticked, Image-Canvas Size 600x600 pixels, placement middle-centre.
Select your background layer, Selections-Select All, floodfill white, Selections-Select None.
Open paper of choice, I used paper 6, edit-copy, paste as a new layer, Layers-Load/Save Mask-Load Mask From Disk-Itamasque088. Layers-Merge-Merge Group.
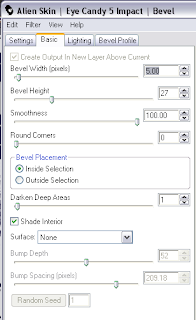
Select LrgeRectangle1 layer, using your magic wand, select inside the shape, Open paper of choice, I used paper 10, edit-copy, paste as a new layer, Selections-Invert, hit delete, Selections-Select None. Repeat this process again but with your LrgeRectangle 2 layer, On both your paper filled rectangle layers Effects-Plugins-Alien Skin -Eye Candy 5 Impact - Bevel, with the settings shown below:-

Delete both of the original LrgeRectangle Layers.
Select SmallRectangle1 layer, using your magic wand, select inside the shape, Select your Large Rectangle Layer that is below the selection, hit delete, Selections-Modify-Expand by 3, Open paper of choice, I used Paper 7, Image-Resize-500x500 pixels, edit-copy, paste as a new layer, Selections-Invert, hit delete, Selections-Select None. Move this layer down in your layer palette below your bevelled frame. repeat this process with your SmallRectangle2 layer.
Add a slight dropshadow to both bevelled outer frames, I used 3-3-34-3 Black.
Select shape1 layer, using magic wand select inside the shape, Open paper of choice, I used paper 4, edit-copy, paste as a new layer, Selections-Invert, hit delete, Selections-Select None. Delete the original shape1 layer. Repeat with shape2 layer.
Select Dot Outline 1 layer, Adjust-Sharpness-Sharpen, add a slight dropshadow I used 3-3-34-3 Black. Repeat with dot Outline 2 layer.
Select Brush 1 layer, Layers-Duplicate, Image-Flip, Image-Mirror, position both brush layers so the the ends of the brush are behind the flower layer.
I deleted both heart layers and replaced using the silk hearts from the kit, which I resized by 50% then again by 60%, make sure these layers are above the dot outline layers.
Open your main image of choice, edit-copy, paste as a new layer, position and add a dropshadow of choice, I used 5-5-55-10.89 Black.
If you wish you can add images inside the frames.
For the wordart, I used One Stroke Script LET, at size 30 pixels and changed it to 48 pixels for the letters D and h,
Add your name and copyright.
Save as .png or .jpg however you prefer.
I hope you found this tut easy to follow,
I would love to see your results.
Luv Jo.xx.


No comments:
Post a Comment