Friday 20 March 2009

My 19th Award - This Blog Gives Me Energy Award

I have received this awesome Award, from Karla @ Karla's Scrapz here
Thank you so very much, please call by Karla's great blog.

I would like to pass this award on to:-

Pearl and Lill @ Devine Dzines here

Jaye @ Sparkling Special Designs here

Both of these sites are truly great, and both extremely worthy of this award.

Please call by and leave them some love.

My 18th Award- Award Of Excellence

I have received this fabulous Award from Pearl and Lill @ DevineDzines here

Thank you so very very much Ladies, this really means a lot.

I would like to pass this award on to:-

Lacarolita @ Lacorolita's Designz here

Please call by this blog it has fabulous ftu and ptu scraps and so much more, its really worth taking a look.

Lisa @ Lisa's Creative Clutter Too.. here

Please visit Lisa's beautiful blog, to see all her fabulous tutorials, wordart and so much more, and absolutely no forgetting her layouts, which she creates and makes available for people to use.

Congratulations Ladies, Luv Jo.xx.

Saturday 14 March 2009

2 Tags By Wendy Using My Tuts


These Two Tags were made for me by a great friend and designer Wendy, using my latest two tuts Lucky Charm and Irish Luck

Thank you For using my tuts and for showing me your results.

Please drop by Wendy's Site here, and see all her fabulous work, please remember to leave her some love.

Thanks Wendy I love them and have them both saved.
Luv Jo.xx.

Friday 13 March 2009

Irish Luck

Supplies Needed:
Image of choice, Im using the awesome artwork of Bam Bam which you can purchase here
Scrapkit - FTU - Irish Luck By Bel Vidotti here

Plugins Used:
VM Extravaganza - Transmission here

Ok Lets Go.

Open a new white image 600x600 pixels, open frame 5 from the kit, edit-copy, paste as a new layer, using your magic wand, select inside the frame, Selections-Modify-Expand by 5, Open paper of choice, I used paper 3, Image-Resize 500x500 pixels, edit-copy, paste as a new layer, Selections-Invert, hit delete, Select None. Move this layer below your frame layer, add a dropshadow of choice to your frame, I used 3-3-34-3 Black.

Open image of choice, edit copy, paste as a new layer, position how you prefer, delete any parts that overlap the bottom of your frame, to do this, I duplicated my image layer and moved one below my frame and one above my frame, delete any excess with your eraser tool from the top image layer. Add a dropshadow of choice to the bottom image layer, I used 4-4-50-9.90 Black.

Open tag 4 from the kit, edit-copy, paste as a new layer, Add a slight dropshadow, again I used 3-3-34-3 Black.

Open flower/s of choice, I used flower 5, and resized by 40% edit copy, paste as a new layer, position by the side of your chosen tag, Layers-Duplicate, Image-Mirror, Add a dropshadow of choice to both layers, again I used 3-3-34-3 Black.

"Shift D" to duplicate your tag and layers, close off your white background layer, Layers-Merge-Merge Visible, Back to your original tag, Select your white background layer and paste as a new layer, Adjust-Blur-Gaussian Blur-20.00, Effects-Plugins-VM Extravaganza-Transmission, Default Settings.

Add any other elements of choice from the kit.

Add your name and copyright.

Save as .png or .jpg however you prefer.

I hope you found this tut easy to follow.
I would love to see your results.
Luv Jo.xx.

Lucky Charm


Supplies Needed:
Image of choice, Im using the fabulous artwork of Ismael Rac, which you can purchase from here
Mask-DMSK0612 By Diana Todd here
Scrapkit - FTU - Lucky Charm By Amy @ Capricious Scraps here
Clover Decor6 Element By Devine Dzines here

Ok Lets Go.

Open a new image 600x600 pixels white, Open frame 2 from the kit, edit-copy, paste as a new layer, Using your magic wand, select inside the frame, Selections-Modify-Expand by 5, Open paper of choice, I used paper 5, Image-Resize 500x500 pixels, edit-copy, paste as a new layer, Selections-Invert, hit delete, Select None. Move this layer below your frame in the layer palette.

Select your white background layer, Open paper of choice, I used paper 3, Image-Resize, 600x600 pixels, edit-copy, paste as a new layer, Layers Load/Save Mask- Load Mask From Disk- dmsk0612, Layers-Merge-Merge Group, I also reduced the opacity of this layer to 61 in the layer palette.

Open image of choice, edit-copy, paste as a new layer, position how you prefer, I also resized mine by 85%, delete any parts overhanging the frame, to make this easier, I duplicated the image and moved one layer above the frame and one below, on the layer above the frame delete any overhang. Add a dropshadow of choice to the layer below the frame. I used 4-4-43-9.90 Black.

Add a slight dropshadow to your frame, I used 3-3-34-3 Black.

Add any other elements of choice.

I also added the Clover Decor6 element from DevineDzines, I deleted the ring holder from the top, edit-copy, paste as a new layer, Image-Resize 65%, Layers-Duplicate, Layers-Merge-Merge Down, Layers-Duplicate, and positioned the duplicate on the other side. I also added a dropshadow of 3-3-34-3 Black.

Add your name and copyright.

Save as .png or .jpg however you prefer.

I hope you found this tutorial easy to follow,
I would love to see your results.
Luv Jo.xx.

A Bit Risky By TigerLilly

This wonderful tag was made for me By Tracey aka Tigerlilly @ Tigerlilly Digital Scrapbooks here, using my A Bit Risky tutorial.

Thank you Tracey for showing me your result and my tag.

Please call by Traceys blog and leave her some love.

Thursday 12 March 2009

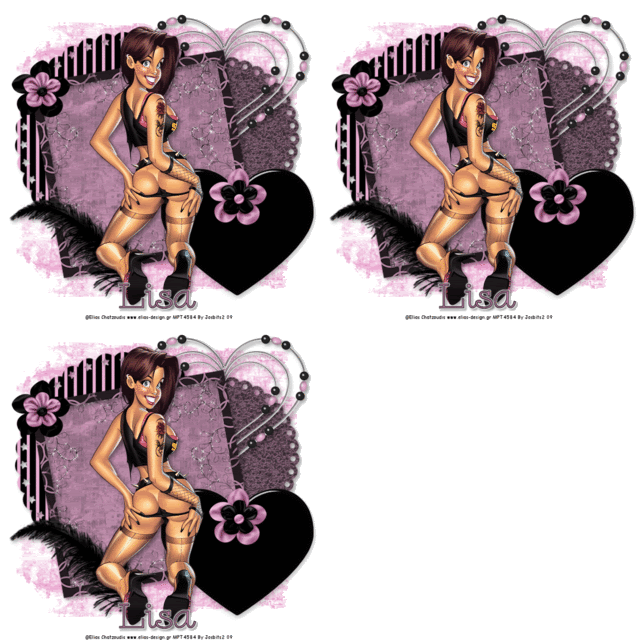
Feeling Sensual

<

Supplies Needed:
Image of choice, Im using the fabulous artwork of Elias Chatzoudis, which you can purchase from here
WSLMask83 By Weescotslass here
Template#68 By Nicole @ Jbs2designs here
Scrapkit - PTU - Sensual By Lisa @ Frosted Illusions here
You can purchase the kit here

Plugins Used:
Alien Skin - Eye Candy 5 - Impact - Glass
Alien Skin - Xenofex2 - Constellation

Ok Lets Go.
Open your template, "Shift D" to duplicate, close the original. Image-Resize 600 pixels width, Lock Aspect Ratio & Resize All Layers -ticked. Image-Canvas Size 600x600 pixels, placement Middle-Centre. Delete the CR info layer. Layers-New Raster Layer, Select All, Floodfill White, Layers-Arrange-Send to Bottom.

Select Scallop 1 layer, Select All-Float-Defloat, Open paper of choice, I used paper 6, Image-Resize 600x600 pixels, edit-copy, paste as a new layer, Selections-Invert, hit delete, Select None. Delete the original scallop 1 layer. Repeat this process with the scallop2 and square layer, using papers of choice.

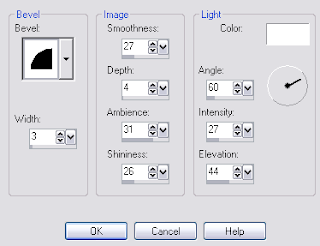
Select Square Frame layer, Select All-Float-Defloat, Open paper of choice, I used paper 8, Image-Resize 150x150 pixels, Effects-Image Effects-Seamless Tiling, with these settings:-
Minimise your paper, In the materials palette, set your foreground colour to pattern, Angle=0, Scale=100, From pattern selections, pick your minimised paper. Layers-New Raster Layer, Floodfill the selection, with your foreground pattern. Select None. Delete the original Square Frame layer.

Open Image of choice, edit-copy, paste as a new layer and position, Add a dropshadow of choice, I used 4-4-37-9.90 Black.
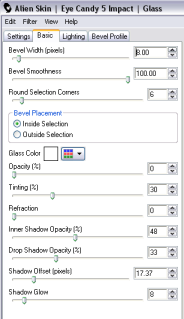
Select the heart layer, Select All-Float-Defloat-Modify-Expand By 2, Floodfill with a colour of choice, I used Black #000000. Effects-Plugins-Alien Skin-Eye Candy 5-Impact-Glass, these settings:-
Photobucket
Add a dropshadow of choice to the scallop layers and the frame, I used 4-4-37-9.90 Black.
Select your white background layer, Open paper of choice, I used paper 2, Image-Resize 600x600 pixels, edit-copy, paste as a new layer, Layers-Load/Save Mask-Load Mask From Disk-WSLMask83, Layers-Merge-Merge Group, I also resixed by 105%.

Add any other elements of choice from the kit.

Add your name and copyright,

If you do not wish to animate:- Save as .png or .jpg however you prefer.

To Animate:-
Select your frame background layer, Duplicate twice for a total of three layers.
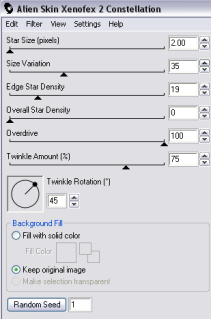
On the top layer-Effects-Plugins-Xenofex 2 -Constellation-Setting=Bling Bling, these settings:-
Photobucket
Repeat for the remaining layers, but hitting random seed, each time.
Close off the bottom 2 layers, make any open layer active, Edit-Copy Special-Copy Merged,
Open Animation Shop-Paste as a new animation.
Back to psp, Close the top layer, and reopen the middle layer, Edit-Copy Special-Copy Merged, back to Animation Shop, Edit-Paste-After current frame.
Back to psp, and repeat with the bottom layer. Back to AS paste after current frame, Select All (Ctrl & A), Animation-Frame Properties-25.

Save as.gif.

I hope you found this tut easy to follow,
I would love to see your results.
Luv Jo.xx.

Wednesday 11 March 2009

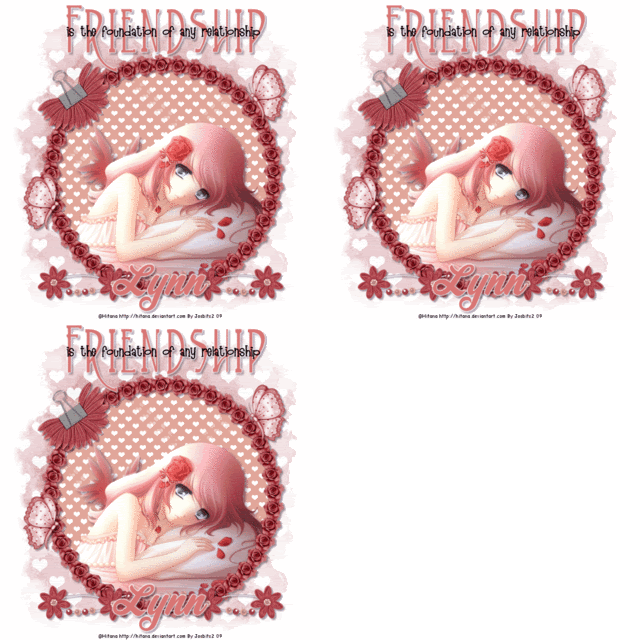
Foundation Of Friendship

Supplies Needed:
Image of choice, Im using the FTU artwork of Hitana, you can visit her here
Scrapkit PTU - Champagne By Lynn @ Poundstore Scraps here
Wordart-quotes1 By Babes Designz here
Mask#22 By Becky Available here

Plugins Needed:
Mura's Meister - Copies here

Ok Lets Go

Open a new white image, 600x600 pixels, Open a flower of choice from the kit, I used rose 2, edit copy, paste as a new layer onto your image, Image-Resize 10%, Effects - Plugins- Mura's Meister-Copies with these settings:-
Using your magic wand, select inside your flower frame, Selections-Modify-Expand By 3, Open paper of choice I used paper 6, Image-Resize 250x250 pixels, Effects-Image Effects-Seamless Tiling, these settings:-
Minimise your paper, Set your foreground colour to pattern, Angle =0 Scale =100 select your minimised paper from the pattern options. Layers-New Raster Layer, Floodfill with your foreground pattern. Selections-Select None. In your layer palette, move this layer below your frame.

Open Image of choice, edit-copy and paste as a new layer, position how you prefer, Add a dropshadow of choice, I used 4-4-43-8.91 Black. Move this layer below your frame, and delete any overhang.

Select your flower frame layer, Adjust-Sharpness-Sharpen, add a dropshadow of choice, I used 3-3-34-3 Black.

Add any other elements of choice from the kit.

Add any wordart/text you wish.

Select white background layer, Open paper of choice, i used paper 5, Image-Resize 600x600 pixels, edit-copy, paste as a new layer, Layers-Load/Save Mask-Load Mask From Disk-Becky Mask022, Layers-Merge-Merge Group. I reduced the opacity of this layer to 61 in the layer palette.

Add name and copyright.

Save as .png or .jpg however you prefer.

To Animate:
Select your mask layer and duplicate it twice, for a total of three layers.
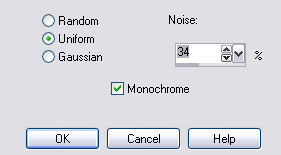
On your top mask layer, Adjust Add/Remove Noise - Add Noise, these settings:-
Repeat with middle mask layer, but change Noise % to 37, and on the bottom mask layer to 40.

Close off the bottom two mask layers, Edit-Copy Special-Copy Merged,
Open Animation Shop, Paste as a new animation, back to psp, close your top mask layer, Open your middle mask layer, Edit-Copy Special-Copy Merged, Back to Animation Shop, Edit-Paste-After Current Frame, Repeat but this time open your bottom mask layer.

Save as .gif.

I hope you found this tut easy to follow.
I would love to see your results.
Luv Jo.xx.

Tuesday 10 March 2009

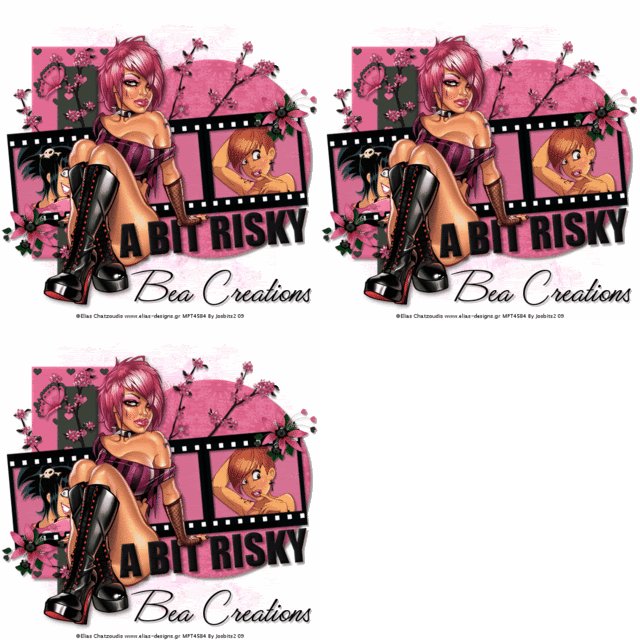
A Bit Risky

Supplies Needed:
Images of choice, Im using the fabulous artwork of Elias Chatzoudis, which you can purchase from here
Template#178 By Missy @ Divine Intentionz here
Scrapkit FTU- Is This Love By Bea @ Bea Creations here
Mask#22 By Becky Available here

Plugin Used:
Alien Skin Eye Candy 5 Texture - Swirl (For Animating Mask)

Ok Lets Go.

Open your template "Shift D" to duplicate, close original template layer, Image-Resize 600 pixels width, Lock Aspect Ratio & Resize All layers ticked. Image-Canvas Size 600x600 pixels, placement Middle-Centre. Select background layer Select All-Floodfill White. Delete the ©By Missy layer.

Select your white background layer, Open paper of choice, I used paper 4, Image-Resize 600x600 pixels, edit-copy, paste as a new layer, Layers-Load/Save Mask - Load Mask From Disk- BeckyMask022, Layers-Merge-Merge Group.

Select Rectangle 1 layer, Select All-Float-Defloat, Open paper of choice, I used paper 9, Image-Resize 500x500 pixels, edit-copy, paste as a new layer, position over selection, Selections-Invert, hit delete, Select None. Delete original rectangle1 layer.

Repeat this process with rectangle2 and the circle layer, using papers of choice.

Select film strip background layer, Select All-Float-Defloat, Open paper of choice, I used paper 2, Image-Resize 600x600 pixels, edit-copy, paste as a new layer, Selections-Invert, hit delete, Select None. Delete original film strip background layer. Select filled film strip background layer, Effects-Texture Effects-Weave these Settings:

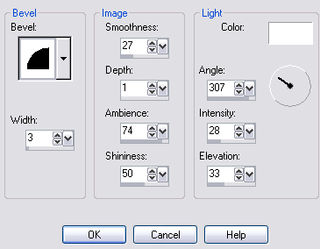
Back to the circle and two rectangle layers, Effects-3D Effects-Inner Bevel, these settings:-

Add a dropshadow of choice to each of these layers, I used 4-4-45-5 Black.

Select the film strip layer, using your magic wand select inside one of the frames, Selections-Modify-Expand by 2, Open Image of choice, I resized mine by 60%, edit copy, paste as a new layer, position inside the selection, Selections-Invert, dit delete, Select None. Add a slight dropshadow, I used 3-3-33-3 Black. Repeat with any of the remaining frames.

Add the same dropshadow to your film strip layer.

Open your main image of choice and paste as a new layer, position how you prefer. Add a dropshadow of choice, I used 4-4-51-10.89 Black.

Add any other elements of choice.

Select your words layer, Effects-Inner Bevel (Same Settings as Before) do this twice. Dropshadow of choice, I used 4-4-45-5 Black.

Add name and copyright.

If you do not wish to animate, save as .png or .jpg however you prefer.

To Animate:
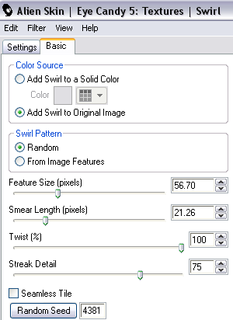
Select your mask layer and duplicate for a total of 3 layers, Effects-Plugins-Alien Skin Eye Candy 5 Texture-Swirl with these Settings:-
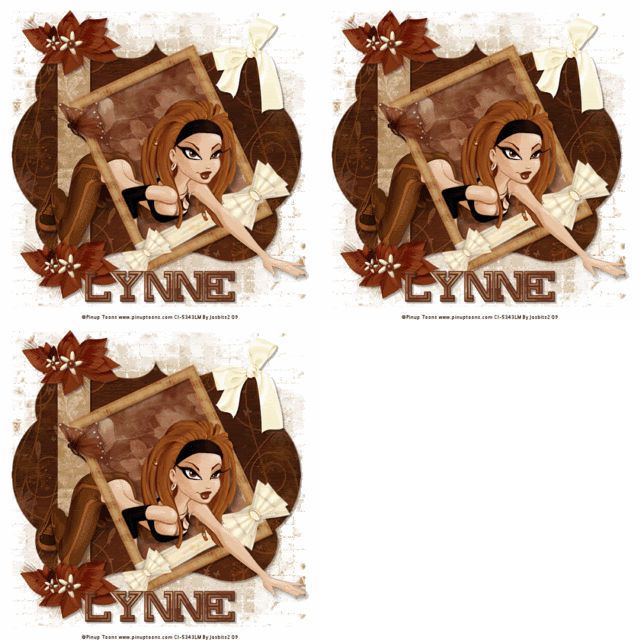
Repeat for each mask layer, but hitting random seed for each.

Close off the bottom 2 mask layers-Edit-Copy Special-Copy Merged,
Go to Animation Shop and paste as a new animation.
Back to psp, repeat but close off the top mask layer and reopen the middle mask layer.
Edit-Copy Special-Copy Merged. Back to Animation Shop, Edit-Paste- After Current Frame.
Repeat with the 3rd Mask layer.
Save as.gif

I hope you found this tut easy to follow.
I would love to see your results.
Luv Jo.xx.

Monday 9 March 2009

My 17th Award

I have received this award from Lynn @ Designs By A Deviant here
Thank you so very very much Lynn.
Please visit Lynn's awesome blog as she has some fabulous freebie kits available.

I would like to pass this award on to:-

Lisa @ Lisa's Creative Clutter Too... here
Please visit Lisa's Amazing blog, she has loads of fabulous tutorials and wordart available.

Laurie @ Laurie Made Me Scraps here
Please visit Laurie's amazing site, where she has lots of great scrap kits and quick pages available.

There are no rules attached to this award.

Ginger Peachy


Supplies Needed:
Image of choice, Im using the artwork of Pinup Toons which you can purchase here
Scrapkit PTU - Brown Sugar By Lynne @ Babycakes Scraps here
You can purchase the kit here
Template#9 By Missy @ Divine Intentionz here
Mask#99 By Itazura here

Plugin Used:-
Alien Skin - Xenofex 2-Constellation (on the mask)

Okay Lets Go.

Open your template, and "Shift D" to duplicate, close the original template, Image-Resize 600 pixels width, All layers ticked. Image - Canvas Size -600x600 pixels, Lock Aspect Ratio NOT ticked, Placement Middle-Centre. Delete the ©by Missy , rectangle frame and flower layer.

Select your white background layer, Selections-Select All, Floodfill White, Selections-Select None.

Open paper of choice from the kit, I used paper 8, Image-Resize 600x600 pixels, edit-copy, paste as a new layer, Layers-Load/Save Mask-Load Mask From Disk-Itamasque099, Layers-Merge-Merge Group.

Select Scallope shape layer, Selections-Select All, Selections-Float, Selections-Defloat, Open paper of choice I used paperfreebie 1, Image-Resize 550x550 pixels, edit-copy, paste as a new layer, Selections-Invert, hit delete, Selections-Select None. Delete the original Scallope Shape Layer.

Select thin rectangle layer, using your magic wand, select inside the shape, Open paper of choice, I used paper 3, Image-Resize 250x250 pixels, and minimise, In your materials palette, set your foreground colour to pattern, Angle 0, Scale 100, From the dropdown choices of patterns, select your minimised paper. Layers-New Raster Layer, Floodfill with your foreground pattern, Selections-Select None. Delete your original thin rectangle layer.

Open frame 3, edit-copy, paste as a new layer, Image-Resize 80%, Image-Free Rotate 25 degrees left, and position, Using your Freehand Selection Tool, Make a selection inside the outer frame, see sample below.


Open paper of choice, I used paper4, Image-Resize 250x250 pixels, Effects-Image Effects-Seamless tiling with these settings:


Minimise your paper, change your foreground pattern, to your new minimised paper, Layers-New Raster Layer, Floodfill with your foreground pattern, Selections-Select None. Move this layer in your layer palette, beneath your frame.

Open Image of choice, edit-copy, paste as a new layer and position how you wish, Add a dropshadow of choice I used V-6 H-6 O-42 B-11.88 Black.

Dropshadow all layers except your background, mask and image layers, I used V-3 H-3 O-34 B-3 Black.

Add any other elements of choice from the kit.

Add your name and copyright.

If you are not animating save as.png or .jpg however you prefer.

To Animate:

Select your mask layer and duplicate twice for a total of 3 layers. On your top layer Effects-Plugins-Xenofex 2-Constellation, Settings select Bling Bling, with these settings:-


Repeat with remaining 2 layers, but hit random seed for each layer.
Close off the middle and bottom copy make any open frame active, Edit-Copy Special-Copy Merged.

Open Animation Shop and paste as a new animation.

Back to PSP, Close off you top mask layer, and reopen your middle mask layer, Edit-Copy Special-Copy Merged, back to animation shop, Edit-Paste-After Current Frame. Repeat for the bottom mask layer.

Save as .gif.

I hope you found this tut easy to follow,
I would love to see your results.
Luv Jo.xx.

Friday 6 March 2009

Award Of Imagination My 16th Award

I have received this award of Imagination from Karla @ Karla Scrapz here

Thank you Karla, for thinking of me.

Please call by and visit Karla's Blog, and leave her some love,
she has some beautiful items available both FTU and PTU,
you will not be disappointed if you visit.

I would like to pass this award on to:-

Pearl & Lill @ Devine Dzines here

Laura @ Cinnamon Scraps here

Jill @ Created By Jill here

Ali @ Dezigns By Ali here

Congratulations Ladies, Please call by their fabulous blogs and leave them some love.

OMG Big Shock

This is my cat "Tiddles" which was named by my daughter who is now 3 yrs old.

Last night she snuggled up to me while watching T.V. OMG she is pregnant, she never goes out, well hardly ever, so we are looking at a few more cats in the house soon for quite a few weeks.

We had mice a year or so ago before I got my cat, I guess I won't be having that problem anytime soon lol.

As you can see my cat has her own armchair, duvet the works, she is spoiled rotten and she knows it lol.

Anyone with any good tips regarding cat pregnancies I am listening.

Thursday 5 March 2009

Spring Critters

Supplies Needed:
Image of choice, Im using the fabulous artwork of Pinup Toons which you can purchase here
Mask#100 By Itazura here
Scrapkit - PTU - Spring Critters By Nikki @ Creative Intentionz here
which you can purchase from here
Template#40 By Blissfully Beth here
Font used GradoGradooNF here

Ok Lets Go.

Open your template, "Shift D" to duplicate, close the original template. Delete the ©info layer and both flower layers. Select the white background layer, Open paper of choice, I used paper 10, edit-copy, paste as a new layer, Layers-Load/Save Mask-Load Mask From Disk - Itamasque100, Layers-Merge-Merge Group.

Select the horiz stripes layer, using your magic wand select inside 1,2 or all 3 stripes, you may need to press the "Shift" key to select more than one, Open paper of choice, Image-Resize 250x250 pixels, and minimise, In your materials palette, Select your foreground colour and change to pattern, Angle=0, Scale=100, from the dropdown pattern options, select your minimised paper, Layers-New Raster Layer, Floodfill with your foreground pattern. Repeat this with any remaining stripes on both horiz stripes and vert stripes layers. Delete both original layers when completed.

Repeat this floodfill process with the grey circle layer.

Select white circle layer, using your magic wand, select inside the black outer circle, Selections-Modify-Smooth, Both set to 6, Layers -New Raster Layer, floodfill the selection with a darker colour from your image of choice, I used #763C24, Selections-Select None. Effects-3D Effects-Inner Bevel-with these settings:-
Delete the original white circle layer, Make your bevelled frame layer active, using your magic wand select inside the frame, Selections-Modify-Expand by 2, Open paper of choice, I used paper 11, Image-Resize 400x400 pixels, edit-copy, paste as a new layer, Selections-Invert, hit delete, Selections-Select None. Move this layer down in your layer palette below the bevelled frame.

Open image of choice and paste as a new layer, position and add a dropshadow of choice, I used 5-5-48-13.86 Black.

Add a dropshadow of choice to all layers except your background, mask and bevelled frame background layers, I used 3-3-34-3 Black.

Add any other elements of choice from the kit.

Add your name and copyright.

Save as .png or .jpg however you prefer.

I hope you found this tut easy to follow.
I would love to see your results.
Luv Jo.xx.

Egg Hunt

To see the animated tag, please click on tag above.
Supplies Needed:
Image of choice, Im using the awesome artwork of Pinup Toons, which you can purchase here
Mask#86 By Itazura here
Scrapkit - FTU Egg Hunt By Laura @ Cinnamon Scraps here

Plugins Used:
Mura's Meister - Copies here
Alien Skin-Xenofex 2-Little Fluffy Clouds (if Animating) demo here
or Muras Meister - Clouds (Non Animated) here
VM Extravaganza - Transmission here

Ok Lets Go.

Open a new image 600x600 pixels white, Open flower of choice from the kit, I used flower 3, edit-copy, paste as a new layer onto your white image, Image-Resize by 20%, Effects-Plugins-Muras Meister-Copies with these settings:-
Using your magic wand, select inside your flower frame, Selections-Modify-Expand by 4, Open paper of choice, I used paper10, Image-Resize 600x600 pixels, edit-copy, paste as a new layer onto your tag, Selections-Invert, hit delete, Selections-Select None. Move this layer below your flower frame in the layer palette.

Open image of choice, edit-copy, paste as a new layer and position. Add a dropshadow of choice, I used 4-4-34-6 Black.

Select your frame background layer, Open the fence from the kit, edit-copy, paste as a new layer onto your tag, Image-Resize 60% (All layers NOT Ticked), move the fence down slightly see mine above for placement. Using your eraser tool delete any parts of the fence that are showing from outside the flower frame. Add a dropshadow of choice, I used 3-3-34-6 Black.

Select your flower frame and add the same dropshadow.

Make the fence layer active, open clipart of choice, edit copy, paste as a new layer, Resize if necessary, I resized by 40%, position and add the same dropshadow as previously used on the fence.

Add any other elememts of choice from the kit.

Select your frame background layer, Selections-Select All, Selections-Float, Selections-Defloat, Open paper 5, Image-Resize 600x600 pixels, edit copy, paste as a new layer, Selections-Invert, hit delete, Selections-Select None.

Select your original frame background layer, using your selection tool (shown below)
Make a selection covering the top half of your frame background layer, to the fence, see my example below: hit delete, select none.
Select white background layer, open paper of choice, I used paper 7, edit-copy, paste as a new layer, Layers-Load/Save Mask-Load Mask From Disk-Itamasque086. Layers-Merge-Merge Group. Effects - Plugins- VM Extravaganza - Transmission Default Settings.

If you do not wish to animate, but would like a cloud effect.
Select the blue frame background layer, Selections-Select All, Selections-Float, Selections-Defloat, In your materials palette make your foreground white, and your background a nice blue, (I used #85BCFC when testing) Effects-Plugins-Muras Meister - Clouds default setting, check your colours are showing in the box, if not select reset colours. apply. Select None.

Add your name and Copyright.

Save as .png or .jpg however you prefer.

To Animate:-
Select the blue frame background layer, duplicate twice, for a total of 3 layers. On your top layer, Effects-Plugins-Alien Skin Xenofex 2 - Little Fluffy Clouds - on the settings tab, select Wispy Morning- these settings:

Repeat this plugin effect on the remaining 2 layers, selecting random seed each time.

Close the bottom 2 blue layers, Select another active layer, Edit-Copy Special-Copy Merged. Open Animation shop and paste as a new animation, back to psp, close off the top blue layer and reopen the middle one. Edit-Copy Special-Copy Merged, back to Animation Shop, Edit-Paste-After Current Frame, back to psp and repeat with the 3rd layer, back to Animation Shop and paste after current frame.
Save as .gif.

I hope you found this tut easy to follow.
I would love to see your results.
Luv Jo.xx.

Wednesday 4 March 2009

Two New Tags From DarkAngelRose

These awesome tags were made by DarkAngelRose following my tuts, This first one was made using my Tis A Great Day tutorial.

This second tag was made using my St Patricks Day Tutorial.

Thank you so very much for sharing your results with me.

I think these are amazing.

Luv Jo.xx.

Tuesday 3 March 2009

I Love Pinup Toons

This Tag is animated, please click to see animated version.

Supplies Needed:
Images of choice, Im using the awesome artwork of Rion Vernon's Pinup Toons, which you can purchase from here
Mask#86 By Itazura here
Scrapkit - PTU - Rion Rocks 1 By Jill @ Created By Jill here
Kit can be purchased @ Aussie Scraps here

Plugins Used:
Alien Skin Xenofex 2 - Constellation (If Animating only)

Ok Lets Go.

Open a new white image 600x600 pixels, Open paper of choice from the kit, I used paper 11, Image-Resize 600x600 pixels, edit-copy, paste as a new layer, Layers-Load/Save Mask - Load Mask From Disk -Itamasque086. Layers-Merge-Merge Group.

Open frame 7 from the kit, edit-copy, paste as a new layer, move it down towards the bottom of the tag a bit, Using magic wand select inside the 4 frames, you may need to hold the "Shift" key to select all four frames. Selections-Modify-Expand by 3, Open paper of choice, I used paper 4, Image-Resize 600x600 pixels, edit-copy, paste as a new layer, Selections-Invert, hit delete, Selections-Select None.

If you wish to add images inside these frames, use your mage wand to select inside the frame you want each image adding to, Selections-Modify-Expand by 2, Open image of choice, edit-copy, paste as a new layer, Resize and position so the bits you wish to see are inside the selection, Selections-Invert, hit delete, Selections-Select None. Repeat this for one or all frames.
Add a slight dropshadow to each image, I used 3-3-34-3 Black.
Add the same dropshadow to the main frame layer.

Open Bracket3 from the kit, using your selection tool, make a selection around one of the brackets, edit-copy, paste as a new layer onto your tag and position, Layers-Duplicate, Image-Free Rotate- Rotate 90% right, Layers-Dulpicate, Image-Free Rotate 90% right, Layers-Duplicate, Image-Free Rotate 90% right, position all 4 brackets so they make a smooth shaped frame, see tag above for placement. Merge these 4 frames together, I did this by selecting the top bracket, and Layerd-Merge-Merge Down. Position this layer in your layer palette below your frame background layer.

Reselect your bracket frame, using the magic wand, select inside the frame, Selections-Modify-Expand by 3, Open paper of choice, I used paper 14, Image-Resize 500x500 pixels, edit-copy, paste as a new layer, Selections-Invert, hit delete, Selections-Select None. Move this layer below your bracket frame in the layer palette.

Select the bracket frame layer, Effects-3D Effects-Inner Bevel, using these settings:- Add a dropshadow of choice, I used 3-3-34-3 Black.


Open image of choice, edit-copy, paste as a new layer, resize if necessary and add a dropshadow of choice, I used 6-6-46-14.85 Black. Delete any parts that overlap the bracket.

Add any other elements of choice.

Add your name and copyright. save as .png or .jpg if you do not wish to animate.

To Animate:
Select your bracket frame background layer, Layers-Duplicate, do this twice for a total of 3 frames. Select the top background layer, Effects-Plugins-Alien Skin Xenofex 2-Constellation using these settings:-,


Repeat these settings with the remaining 2 layers, but hit random seed, for each remaining layer.

Close off the bottom 2 bracket background layers, make your bracket frame active.

Edit-Copy Special-Copy Merged, Open Animation Shop and paste as a new animation, back to psp, close off the top bracket background layer, Edit-Copy Special-Copy Merged, back to Animation Shop, Edit-Paste-After Current Frame.
Repeat with the 3rd bracket background layer.

Save as .gif file.

I hope you found this tut easy to follow.
I would love to see your results.
Luv Jo.xx.

Great Day T'be Green

Supplies Needed:
Image of choice, Im using the artwork of Suzanne Richards which you can purchase here
Template#55 By Rachel @ Scraps Of Enchantment here
Mask#53 By Rachel @ Enchanted By Darkness here
Scrapkit - PTU- Irish Charm By Lynn @ Poundstore Scraps here
Wordart#8 By Me You can download here

Ok Lets Go.

Open your template and "Shift D" to duplicate, close original template layer. Image-Resize 600 pixels width, Lock Aspect Ratio & Resize All Layers Ticked. Image-Canvas Size Width 600 pixels-Height 500 pixels, Lock Aspect Ratio NOT ticked, Placement-Middle-Centre, Delete the ©Info and little flowers layers.

Select Background layer, Selections-Select All, Floodfill white. Selections-Select None. Open paper of choice, I used paper6, Image-Resize 250x250 pixels, minimise, In your materials palette change foreground colour to pattern, Angle=0 Scale=100 and select your minimised paper from the dropdown. Back to tag, Layers New Raster layer floodfill with your foreground pattern. Layers - Load/Save Mask - Load Mask From Disk-EBDMask53. Layers -Merge-Merge Group. Close paper 6.

Select LightGreyRectangle layer, Selections-Select All (Ctrl A), Selections-Float (Ctrl & F), Selections-Defloat (Ctrl,Shift & F), Open paper of choice, I used paper 6 again, but this time, Image-Resize 600x600 pixels, edit-copy, paste as a new layer, Selections-Invert (Ctrl,Shift & I), hit delete, Selections-Select None (Ctrl & D). Add a slight dropshadow of choice, I used 3-3-34-3 Black. Delete the original LightGreyRectangle Layer.

Repeat the above process with the BlackRectangle Layer, this time I used paper 8, and the DarkGrey Rectangle layer, which I used paper 1.

Select your circle layer, Using magic wand, select inside the circle, Open paper of choice, I used paper 5, Image-Resize 500x500 pixels, edit-copy, paste as a new layer on to your tag, Selections-Invert, hit delete, Selections-Select None, Add the same dropshadow, Delete original circle layer.

Select circle dots layer, make sure its just above the circle layer, and add the same dropshadow as before.

Select the shape layer, Image-Resize 120%, All layers NOT ticked, Selections-Select All, Selections-Float, Selections-Defloat, Selections-Modify-Smooth both set to 10, Open paper of choice, I used paper 8, edit-copy, paste as a new layer, Selections-Invert, hit delete, Selections-Select None. Add a dropshadow same settings as before. Delete original shape layer.

Open image of choice, edit-copy, paste as a new layer, I resized mine by 80% and positioned, add a dropshadow of choice, I used 5-5-48-9.90 Black. Delete any parts that over lap and you don't wish to see.

Add any other elements of choice from the kit.

Add wordart of choice if you wish.
Add name and copyright.
Save as .png or .jpg however your prefer.

I hope you found this tut, easy to follow.
I would love to see your results.
Luv Jo.xx.

Monday 2 March 2009

Summer Loving


Supplies Needed:
Image of choice, Im using the awesome artwork of Keith Garvey which you can purchase here
Mask#55 By Rachel @ Enchanted By Darkness here
Scenic Image of choice, mine is by Mike Mackinven courtesy of stock xchng here
Scrapkit FTU - Happy Time By Bea @ Bea Creations here

Ok Lets Go.

Open a new Image 600x600 pixels white, open your scenic image of choice and resize to 600x600 pixels, edit copy, paste as a new layer, Layers Load/Save Mask - Load Mask From Disk - EBDMask55, Layers Merge-Merge Group. Duplicate this layer till you have the effect and transparency you prefer. Close off your background layer, and merge visible the scenic mask layers. Re-open your white background layer.

Open frame 2 from the kit, edit-copy, paste as a new layer, I resized by 85%, Using your magic wand select inside the four frames, you may need to hold down your "Shift" key, to select all four, Selections - Modify - Expand by 3, Open paper of choice, I used paper 6, Image-Resize 600x600 pixels, edit-copy, paste as a new layer, Selections-Invert, hit delete, Selections-Select None. In your layer palette move this layer down below your frames.

If you wish to add any images to the frames, select inside the frame you wish to add an image to, Selections - Modify - Expand by 3, open image of choice, edit-copy, paste as a new layer, position and resize to how you think looks best, Selections-Invert, hit delete, Selections-Select None. If you wish to change the colour like I have done, either in your layer palette set your Blend Mode to Luminence Legacy or using Adjust - Hue & Saturation - Colorize, I changed mine to Hue-3 Saturation-184.

Open your main image of choice, edit-copy, paste as a new layer, position and resize if necessary, I resized mine by 90%, add a dropshadow of choice, I used 5-5-55-14.85 Black.

Add any other elements of choice from the kit.

Add your name and copyright.

Save as .png or .jpg however you prefer.

I hope you found this tut easy to follow.
I would love to see your results.
Luv Jo.xx.

Tags By Yaibaby


These 2 tags were made by Yaibaby who is a member of PSP Obsessions Forum here

Using my Cutie Pie and Kiss Me I'm Irish Tutorial.

Thank you for my tag and for showing me your results.

Luv Jo.xx.

I'll Be Your No.1.


Supplies Needed:
Image of choice, Im using the fabulous artwork of Keith Garvey which you can purchase here
Template#36 By Rachel @ Scraps Of Enchantment here
Mask#25 By Rachel @ Enchanted By Darkness here
Scrapkit - PTU I Heart You Mega Kit By Rachel @ Captivated Visions here
You can purchase this kit here

Ok Lets Go.

Open your Template#36, "Shift D" to duplicate and close your original template. Image-Resize 600 pixels width, Lock Aspect Ratio and Resize All Layers ticked. Delete the ©info layer and both the hearts layers.
Select your BlackShape layer, using your magic wand, select inside the shape, Selections-Modify-Smooth (Smothing Amount 25, Corner Scale 10, ) Anti-Alias & Preserve Corners ticked, Open paper of choice, I used paper 21, Image-Resize 500x500 pixels, edit-copy, paste as a new layer, position to cover the selection, Selections-Invert, hit delete, Selections - Select None. Delete the original BlackShape layer.

Repeat this process with the greyshape layer, this time I used paper 2.

Select the whiteshape layer, using your magic wand, select inside the white shape, Selections-Modify-Smooth (Same settings) select your filled greyshape layer, hit delete, Open paper of choice, I used paper 4, Image-Resize 500x500 pixels, edit-copy, paste as a new layer, Selections-Modify-Expand by 4, Selections-Invert, hit delete, Selections-Select None. In your layer palette move this layer below your 2nd filled shape layer.

Open image of choice, edit-copy, paste as a new layer, position and delete any excess that overlaps your frame shape layer. Add a dropshadow of choice, I used 5-5-41-5.94 Black.

Add any other elements of choice from the kit.

Select your white background layer. Open paper of choice, I used paper 30, Image-Resize 600x600 pixels, edit-copy, paste as a new layer, Layers Load/Save Mask - Load Mask From Disk-EBDMask25, Layers - Merge - Merge Group.

Add your name and copyright.

I hope you found this tut easy to follow.
I would love to see your results.
Luv Jo.xx.

My 15th Award

I have received this award "Determined Woman Award" from Tracey @ Digital Scrapbooks here
please drop by and leave some love.
The Rules of this award are as follows:-
  • Publish the award on your blog.
  • Link back to the person who gave you the award.
  • Select 10 people who you think deserves this award.

Here are my choices:-

  1. Lynn @ Poundstore Scraps here
  2. Lisa @ Lisa's Creative Clutter Too... here
  3. Beth @ Blissfully Beth here
  4. Karla @ Karlascrapz here
  5. Bea @ Bea Creations here
  6. Laura @ Cinnamon Scraps here
  7. Laurie @ Laurie Made Me Scraps here
  8. Rachel @ Scraps Of Enchantment here
  9. Lacarolita @ Lacarolita's Designz here
  10. Doris @ Scraps Dimensions here

Congratulations Ladies, I love your work and your blog.

Please call by and leave them some love.

Luv Jo.xx.

Friday 27 February 2009

My 14th Award

I received this award from Lisa @ Lisa's Creative Clutter Too... here
Please drop by and visit this awesome site.
She has tuts and wordart and omg does this site rock,
please call by and leave some love.
I need to pass this on to 5 awesome blogs.
well most have already received this award,
so I will name my top 5.
  1. Scraps Dimensions here
  2. Bea Creations here
  3. Blissfully Beth here
  4. Kittz Kreations here
  5. Cinnamon Scraps here

Congratulations Ladies you have awesome sites and I love them all.

Luv Jo.xx.

Thursday 26 February 2009

Kiss Me I'm Irish

Supplies Needed:
image of choice, Im using the fabulous artwork of Keith Garvey, you can purchase here
Scrapkit - FTU - Irish Charm By Bluedream Designs here
Mask #1 By Devine Dzines here

Plugins:
VM Extravaganza - Transmission

OK Lets Go.

Open a new image 600x600 pixels white, Open frame 4 from the kit, edit-copy, paste as a new layer, Image-Resize by 80%, using your magic wand, select inside the frame, Selections-Modify-Expand by 3, Open paper of choice, I used paper 7, edit-copy, paste as a new layer, Selections-Invert, hit delete, Selections-Select None. Move this layer down in the layer palette, below your frame layer.
Open image of choice, edit-copy, paste as a new layer, I also resized mine by 90%, position, Layers-Duplicate, move original layer below your frame layer. Select your frame, Selections-Select All, Selections-Float, Selections-Defloat, Select your bottom image layer, and delete any parts overhanging your frame, Select your top image layer and again delete any overhang.

On your image layer, add a dropshadow of choice, I used 5-5-50-9.90 Black.

Select your frame layer add a dropshadow of choice, I used 4-4-35-7.92 Black.

Select your white background layer, Open paper of choice, I used paper1, edit-copy, paste as a new layer, Open your mask#1 by Devine Dzines and minimise, Layers- New Mask Layer-From Image, In the drop down box, select 1.jpg, Layers-Merge,Merge-Group. Image-Resize 140%, All layers not ticked, and position, add a dropshadow of choice, I used 3-3-34-3 Black.

Select Raster 2 layer, Layers-Duplicate, on your bottom raster 2 layer, Layers-Arrange-Send to bottom, move below your mask layer, Adjust -Blur-Gaussian Blur-50, Layers-Duplicate, Layers-Merge-Merge Down, Effects-Plugins-VM Extravaganza-Transmission @ Default Setting.

Add any elements of choice from the kit.

Add your name and copyright.

I hope you found this tut easy to follow.
I would love to see your results.
Luv Jo.xx.

St Patricks Day

Supplies Needed:
Image of choice, Im using the awesome artwork of Pinup Toons which you can purchase here
Template-Pack of 4 Templates No.4 By Dezigns By Ali here
Leprechaun and Pot of gold courtesy of Rainbow Coffi here
Scrapkit -PTU- Bit O'Green By Jill @ Created By Jill here
Kit can be purchased here
Mask#27 By Itazura here

Ok Lets Go.

Open your Template no.4, "Shift D" to duplicate, close original template layer. Image-Resize 600 pixels width, make sure Lock Aspect Ratio and Resize All Layers is ticked.

Image-Canvas Size 600x600 pixels, placement middle-centre. Delete the both raster 7 layers and the Raster 6 layer. Layers-New Raster Layer, Floodfill white. Layers-Arrange-Send To Bottom.

Select Raster 1 layer, using your magic wand, select inside the shape, Open paper 4, Image-Resize 600x600 pixels, edit-copy, paste as a new layer onto your template tag, Selections-Invert, hit delete, Selections-Select None, Delete the original Raster 1 layer.

Select copy of raster 1 layer, Repeat the above process using paper8, and delete the original copy of raster 1 layer.

Repeat this process with raster 3,4 and copy of raster 4 using papers of choice.

With the raster 3 layer I also applied a dropshadow of 3-3-34-3 Black, and repeated again using -3 for both horizontal and vertical.

With both Raster 5 layers and raster 2 layer. Selections-Select All, Selections-Float, Selections-Defloat, Open paper of choice, I used paper 5, Image-Resize 600x600 pixels, edit-copy, paste as a new layer onto tag template, Selections-Invert, hit delete, Selections-Select None.

I also applied Effects-3D Effects-Inner Bevel-with these settings:- ( also applied a dropshadow of 3-3-34-3 Black.
Open Image of choice, edit-copy, paste as a new layer, and position. I also applied a dropshadow of 5-5-59-8.91 Black.

Add any other elements of choice from the kit.

Select your white background layer, Open paper 8, Image-Resize 600x600 pixels, edit-copy, paste as a new layer, Layers-Load/Save Mask-Load Mask From Disk-Itamasque027, Layers-Merge Merge Group.

Add your name and copyright.

Save as .png or .jpg however you prefer.

I hope you found this tut easy to follow.
I would love to see your results.
Luv Jo.xx.

Wednesday 25 February 2009

Tis A Great Day

Supplies Needed:
Image of choice, Im using the fabulous artwork of Pinup Toons, you can purchase here
Scrapkit PTU - Bit O Green By Jill @ Created By Jill here
Kit can be purchased here
Scenic image of choice, image used is by Winterdove courtesy of stock.xchng here
Mask#55 By Rachel @ Enchanted By Darkness here

OK Lets Go.

Open a new white image 600x600 pixels, Open frame1 from the kit, edit-copy, paste as a new layer, using your magic wand, select inside the frame, Selections-Modify-Expand by 4, Open paper of choice, I used paper 7, Image-Resize 600x600 pixels, edit-copy, paste as a new layer, onto your tag, Selections-Invert, hit delete, Selections-Select None. In your layer palette move this layer below your frame layer.

Open your beadedshamrock, edit-copy, paste as a new layer above your frame, and position inside the frame, using your magic wand select inside the beaded shamrock, be sure to select the bits between bow and beaded frame, Selections-Modify-Expand by 2, Open your scenic image of choice, I resized mine by 50%, edit-copy, paste as a new layer, Selections-Invert, hit delete, Selections-Select None. Move this layer below the beaded shamrock layer.

Add a dropshadow of choice to both frame layers, I used 3-3-32-3 Black.

Open image of choice, edit-copy, paste as a new layer, position how you prefer. I resized mine by 85%, add a dropshadow of choice, I used 5-5-48-8.91 Black.

Add any other elements of choice from the kit.

Select your white background layer, Open paper of choice, I used paper 8, Image-Resize 600x600 pixels, edit-copy, paste as a new layer, Layers Load/Save Mask - Load Mask From Disk-EBDMask55. Layers - Merge - Merge Group.

Add your name and copyright.

Save as .png or .jpg however you prefer.

I hope you found this tut easy to follow.
I would love to see your results.
Luv Jo.xx.

Tuesday 24 February 2009

Tags Made Using My Tuts


These awesome tags were made by some fabulous members of PSP Obsessions here
using my tuts, which I also post there.
Thank you so very much Pam, MagnettaRose, DarkAngelRose and Bobbisox for showing me your results.
Pam didnt have the PTU Kit I used so she used another kit, and learnt how to add steam.
Well I think it looks amazing hunni, thank you for showing me, and I am glad the tut helped.
Luv Jo.xx.