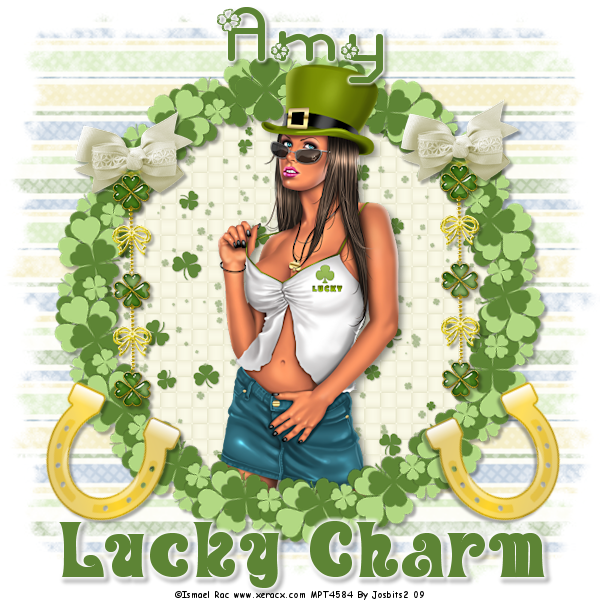
Friday 20 March 2009

My 19th Award - This Blog Gives Me Energy Award

I have received this awesome Award, from Karla @ Karla's Scrapz here
Thank you so very much, please call by Karla's great blog.

I would like to pass this award on to:-

Pearl and Lill @ Devine Dzines here

Jaye @ Sparkling Special Designs here

Both of these sites are truly great, and both extremely worthy of this award.

Please call by and leave them some love.

My 18th Award- Award Of Excellence

I have received this fabulous Award from Pearl and Lill @ DevineDzines here

Thank you so very very much Ladies, this really means a lot.

I would like to pass this award on to:-

Lacarolita @ Lacorolita's Designz here

Please call by this blog it has fabulous ftu and ptu scraps and so much more, its really worth taking a look.

Lisa @ Lisa's Creative Clutter Too.. here

Please visit Lisa's beautiful blog, to see all her fabulous tutorials, wordart and so much more, and absolutely no forgetting her layouts, which she creates and makes available for people to use.

Congratulations Ladies, Luv Jo.xx.

Saturday 14 March 2009

2 Tags By Wendy Using My Tuts


These Two Tags were made for me by a great friend and designer Wendy, using my latest two tuts Lucky Charm and Irish Luck

Thank you For using my tuts and for showing me your results.

Please drop by Wendy's Site here, and see all her fabulous work, please remember to leave her some love.

Thanks Wendy I love them and have them both saved.
Luv Jo.xx.

Friday 13 March 2009

Irish Luck

Supplies Needed:
Image of choice, Im using the awesome artwork of Bam Bam which you can purchase here
Scrapkit - FTU - Irish Luck By Bel Vidotti here

Plugins Used:
VM Extravaganza - Transmission here

Ok Lets Go.

Open a new white image 600x600 pixels, open frame 5 from the kit, edit-copy, paste as a new layer, using your magic wand, select inside the frame, Selections-Modify-Expand by 5, Open paper of choice, I used paper 3, Image-Resize 500x500 pixels, edit-copy, paste as a new layer, Selections-Invert, hit delete, Select None. Move this layer below your frame layer, add a dropshadow of choice to your frame, I used 3-3-34-3 Black.

Open image of choice, edit copy, paste as a new layer, position how you prefer, delete any parts that overlap the bottom of your frame, to do this, I duplicated my image layer and moved one below my frame and one above my frame, delete any excess with your eraser tool from the top image layer. Add a dropshadow of choice to the bottom image layer, I used 4-4-50-9.90 Black.

Open tag 4 from the kit, edit-copy, paste as a new layer, Add a slight dropshadow, again I used 3-3-34-3 Black.

Open flower/s of choice, I used flower 5, and resized by 40% edit copy, paste as a new layer, position by the side of your chosen tag, Layers-Duplicate, Image-Mirror, Add a dropshadow of choice to both layers, again I used 3-3-34-3 Black.

"Shift D" to duplicate your tag and layers, close off your white background layer, Layers-Merge-Merge Visible, Back to your original tag, Select your white background layer and paste as a new layer, Adjust-Blur-Gaussian Blur-20.00, Effects-Plugins-VM Extravaganza-Transmission, Default Settings.

Add any other elements of choice from the kit.

Add your name and copyright.

Save as .png or .jpg however you prefer.

I hope you found this tut easy to follow.
I would love to see your results.
Luv Jo.xx.

Lucky Charm


Supplies Needed:
Image of choice, Im using the fabulous artwork of Ismael Rac, which you can purchase from here
Mask-DMSK0612 By Diana Todd here
Scrapkit - FTU - Lucky Charm By Amy @ Capricious Scraps here
Clover Decor6 Element By Devine Dzines here

Ok Lets Go.

Open a new image 600x600 pixels white, Open frame 2 from the kit, edit-copy, paste as a new layer, Using your magic wand, select inside the frame, Selections-Modify-Expand by 5, Open paper of choice, I used paper 5, Image-Resize 500x500 pixels, edit-copy, paste as a new layer, Selections-Invert, hit delete, Select None. Move this layer below your frame in the layer palette.

Select your white background layer, Open paper of choice, I used paper 3, Image-Resize, 600x600 pixels, edit-copy, paste as a new layer, Layers Load/Save Mask- Load Mask From Disk- dmsk0612, Layers-Merge-Merge Group, I also reduced the opacity of this layer to 61 in the layer palette.

Open image of choice, edit-copy, paste as a new layer, position how you prefer, I also resized mine by 85%, delete any parts overhanging the frame, to make this easier, I duplicated the image and moved one layer above the frame and one below, on the layer above the frame delete any overhang. Add a dropshadow of choice to the layer below the frame. I used 4-4-43-9.90 Black.

Add a slight dropshadow to your frame, I used 3-3-34-3 Black.

Add any other elements of choice.

I also added the Clover Decor6 element from DevineDzines, I deleted the ring holder from the top, edit-copy, paste as a new layer, Image-Resize 65%, Layers-Duplicate, Layers-Merge-Merge Down, Layers-Duplicate, and positioned the duplicate on the other side. I also added a dropshadow of 3-3-34-3 Black.

Add your name and copyright.

Save as .png or .jpg however you prefer.

I hope you found this tutorial easy to follow,
I would love to see your results.
Luv Jo.xx.