
Supplies Needed:
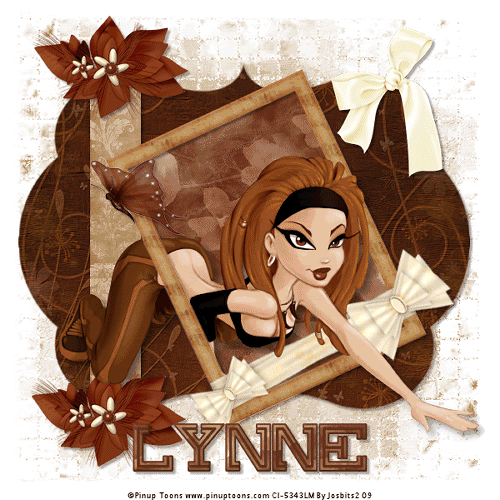
Image of choice, Im using the artwork of Pinup Toons which you can purchase here
Scrapkit PTU - Brown Sugar By Lynne @ Babycakes Scraps here
You can purchase the kit here
Template#9 By Missy @ Divine Intentionz here
Mask#99 By Itazura here
Plugin Used:-
Alien Skin - Xenofex 2-Constellation (on the mask)
Okay Lets Go.
Open your template, and "Shift D" to duplicate, close the original template, Image-Resize 600 pixels width, All layers ticked. Image - Canvas Size -600x600 pixels, Lock Aspect Ratio NOT ticked, Placement Middle-Centre. Delete the ©by Missy , rectangle frame and flower layer.
Select your white background layer, Selections-Select All, Floodfill White, Selections-Select None.
Open paper of choice from the kit, I used paper 8, Image-Resize 600x600 pixels, edit-copy, paste as a new layer, Layers-Load/Save Mask-Load Mask From Disk-Itamasque099, Layers-Merge-Merge Group.
Select Scallope shape layer, Selections-Select All, Selections-Float, Selections-Defloat, Open paper of choice I used paperfreebie 1, Image-Resize 550x550 pixels, edit-copy, paste as a new layer, Selections-Invert, hit delete, Selections-Select None. Delete the original Scallope Shape Layer.
Select thin rectangle layer, using your magic wand, select inside the shape, Open paper of choice, I used paper 3, Image-Resize 250x250 pixels, and minimise, In your materials palette, set your foreground colour to pattern, Angle 0, Scale 100, From the dropdown choices of patterns, select your minimised paper. Layers-New Raster Layer, Floodfill with your foreground pattern, Selections-Select None. Delete your original thin rectangle layer.
Open frame 3, edit-copy, paste as a new layer, Image-Resize 80%, Image-Free Rotate 25 degrees left, and position, Using your Freehand Selection Tool, Make a selection inside the outer frame, see sample below.

Open paper of choice, I used paper4, Image-Resize 250x250 pixels, Effects-Image Effects-Seamless tiling with these settings:

Minimise your paper, change your foreground pattern, to your new minimised paper, Layers-New Raster Layer, Floodfill with your foreground pattern, Selections-Select None. Move this layer in your layer palette, beneath your frame.
Open Image of choice, edit-copy, paste as a new layer and position how you wish, Add a dropshadow of choice I used V-6 H-6 O-42 B-11.88 Black.
Dropshadow all layers except your background, mask and image layers, I used V-3 H-3 O-34 B-3 Black.
Add any other elements of choice from the kit.
Add your name and copyright.
If you are not animating save as.png or .jpg however you prefer.
To Animate:
Select your mask layer and duplicate twice for a total of 3 layers. On your top layer Effects-Plugins-Xenofex 2-Constellation, Settings select Bling Bling, with these settings:-

Repeat with remaining 2 layers, but hit random seed for each layer.
Close off the middle and bottom copy make any open frame active, Edit-Copy Special-Copy Merged.
Open Animation Shop and paste as a new animation.
Back to PSP, Close off you top mask layer, and reopen your middle mask layer, Edit-Copy Special-Copy Merged, back to animation shop, Edit-Paste-After Current Frame. Repeat for the bottom mask layer.
Save as .gif.
I hope you found this tut easy to follow,
I would love to see your results.
Luv Jo.xx.


No comments:
Post a Comment