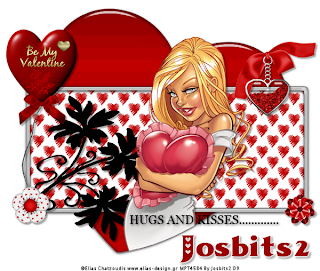
 Supplies needed:
Tube of choice- I am using the fantastic art of Elias Chatzoudis you can purchase Here
Plugins.
Alien Skin Eye Candy 5 Impact - Glass.
O.K Let's Go...
Open your template "Shift D" to duplicate close off the original, delete the copyright layer. Go Image Resize-Change the pixel dimension setting to pixels and width to 600. Make sure lock aspect ratio is ticked, and Resize all layers is ticked, Apply.Layers New Raster layer, select all and floodfill white. Select none, layers arrange - send to bottom.
Open paper 9 from the kit and resize to 20%, edit-copy, back to tag and make raster 1 the active layer, Selections-select all-float-defloat, paste paper 9 as a new layer, selections invert- hit delete on your keyboard, select none. Delete raster 1 layer.
Open paper 5, resize by 20%, then resize again by 80%, back to tag, make raster 2 the active layer, again selections - select all-float-defloat, paste paper 5 as a new layer, selections-invert, hit delete, select none. Delete raster 2 layer.
Select raster 3 and give a dropshadow of choice, I used 3-3-34-3 Black. then repeat dropshadow but change Horizontal and Vertical to -3.Open image of choice and paste as a new layer, I resized by 80% and gave a dropshadow of 3-3-34-3 Black.
Select Raster 8 Selections - select all, Selections - float, Selections - defloat, Selections -invert, activate your image layer should be raster 2, using your eraser tool delete any excess from the bottom of the heart. select none. Move your image down slightly to cover the line showing from the heart below. Then make raster 8 active and give a dropshadow (3-3-34-3 Black)Delete raster 5 and copy of raster 5. we aren't using these.
Activate raster 4 and dropshadow 3-3-34-3 Black.Make raster 6 the active layer, Open flower1.png and resize by 20% and paste as a new layer, I placed mine bottom left, see above for placing. Adjust - Sharpness - Sharpen, add dropshadow.
Open your Valentine Balloon, resize by 60% and paste as a new layer below your flower layer, move the balloon to the left so the end of the string is being held by the flower. Adjust-Sharpness-Sharpen, add dropshadow 3-3-34-3 Black.
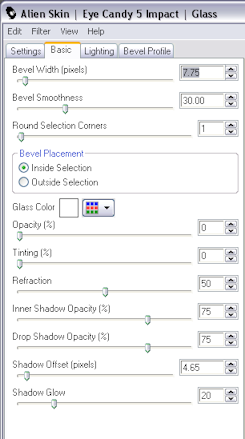
Make Raster 3 active - apply your plugin Alien Skin Eye Candy 5 Impact - Glass with these settings.
Click Ok.
Activate raster 8 and apply glass plugin again changing the Bevel width to 13.85, Click Ok.
Add any other elements you wish.
Add your name and copyright and save as .png or .jpg as you prefer.
I hope you found this tutorial easy to follow, any problems please don't hesitate in letting me know.
I would love to see you results.
Luv Jo.xx.


No comments:
Post a Comment