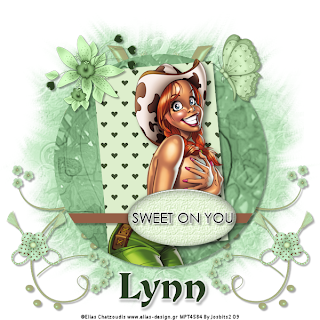
Supplies Needed:
Image of choice I am using Elias Chatzoudis which you can purchase here
Scrapkit FTU Envy By Lynn at Poundstore Scraps here
Scrapkit FTU Envy By Lynn at Poundstore Scraps here
Template Missy_tagtemplate126 here
Mask WSL_Mask241 By Weescotslass here
Font is PTU Devinne Ornament
Plugins:
Eye Candy 4000 - Gradient Glow
Alien Skin Eye Candy 5 Impact - Glass
OK Lets Go.
Open Template and "Shift D" to duplicate, close the original template, Click on background layer, Image-Canvas size 600x600, placement middle centre, Click ok. Selections-Select all, Floodfill white, Selections-Select None. Delete the watermark layer.
Activate circle layer, Selections-Select all, Selections-Float, Selections-Defloat, Open paper 7 from the kit and Image-resize change to pixels 600x600, All layers ticked. Edit-copy, Back to template and paste as a new layer, Selections-Invert, hit delete, Selections-Select None.
Delete the original circle layer.
Activate rectangle layer, Selections-Select all, Selections-Float, Selections-Defloat, Open paper1, Image resize 600x600 pixels, edit-copy, paste as a new layer onto the tag, Selections-Invert, Delete. Selections-Select None. Delete the original rectangle layer.
Open image of choice and paste as a new layer, I resized mine by 80%, position add a dropshadow I used 6-6-49-11.88 Black.
Activate Raster 1, Selections-Select all, Selections-Float, Selections-Defloat, Selections-Invert, activate your image layer (raster 3) and using the eraser tool, delete any parts of your tube that overlaps the bottom of your circle layer, Selections-Select None.
Activate thin rectangle layer, Selections-Select all, Selections-Float, Selections-Defloat, Layers-New raster layer, floodfill with a colour of your choice, I used #945F46, Selections-Select None, Delete the original thin rectangle layer.
Activate the oval layer, Selections-Select All, Selections-Float, Selections-Defloat, Open paper 3, edit-copy, paste as a new layer onto your tag, Selections-Invert, Delete, Selections-Select None.
Delete the original oval layer.
Add a dropshadow to raster1, raster2 and raster 4, I used 4-4-34-4 Black.
Activate Sweet on you layer, Edit effects Plugins Eye Candy 4000-Gradient Glow
with the following settings: White
Dropshadow 3-3-34-3 Black. Layers-Merge-Merge Down.
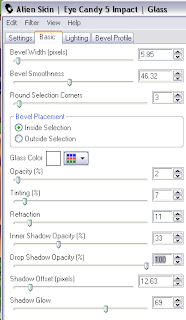
Go to Effects-Plugins- Alien Skin Eye Candy 5 Impact -Glass with these settings:-

Repeat the glass effect.
Activate Background layer, Open paper 4, Image-Resize 600x600 pixels, edit-copy, back to tag and paste as a new layer. Go to Layers-load/save mask WSL_Mask241, Delete the black mask layer, Click yes in the popup box, Layers-Merge-Merge Group.
Add any other elements of choice from the kit and dropshadow, I used 3-3-34-3 Black.
Add your name and copyright.
Save as .png or .jpg however you prefer.
I hope you found this tutorial easy to follow,
any problems please dont hesitate in letting me know,
I would love to see your results.
Luv Jo.xx.
any problems please dont hesitate in letting me know,
I would love to see your results.
Luv Jo.xx.


No comments:
Post a Comment